Showing posts with label Videos. Show all posts

Wednesday, January 27, 2021

Impression Obsession - Old is New

With such a huge collection of wonderful stamps from so many artists, sometimes the older stamps in the Impression Obsession catalog find their way out of the spotlight. We don't want them to be forgotten, so we like to feature them regularly. We hope you're inspired! 
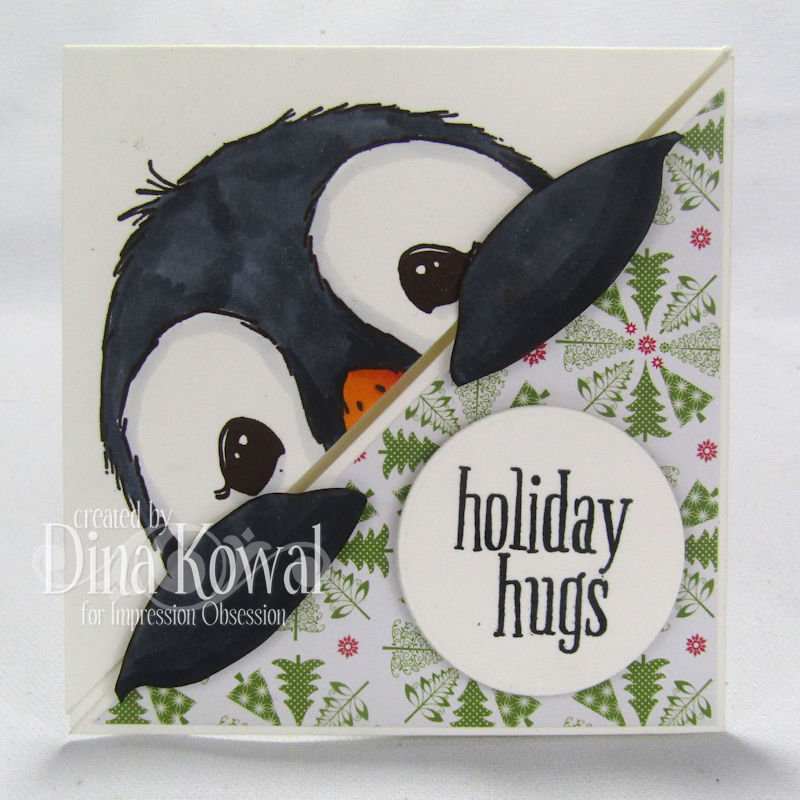
I chose some images from a few years back - this silhouette image is by Gail Green, and the sentiment is one of mine. The new Layered Leopard stencils seemed like a perfect background - if you'd like to know how I created this background, you can find the video over on my Youtube Channel! Some fun tips for you over there.
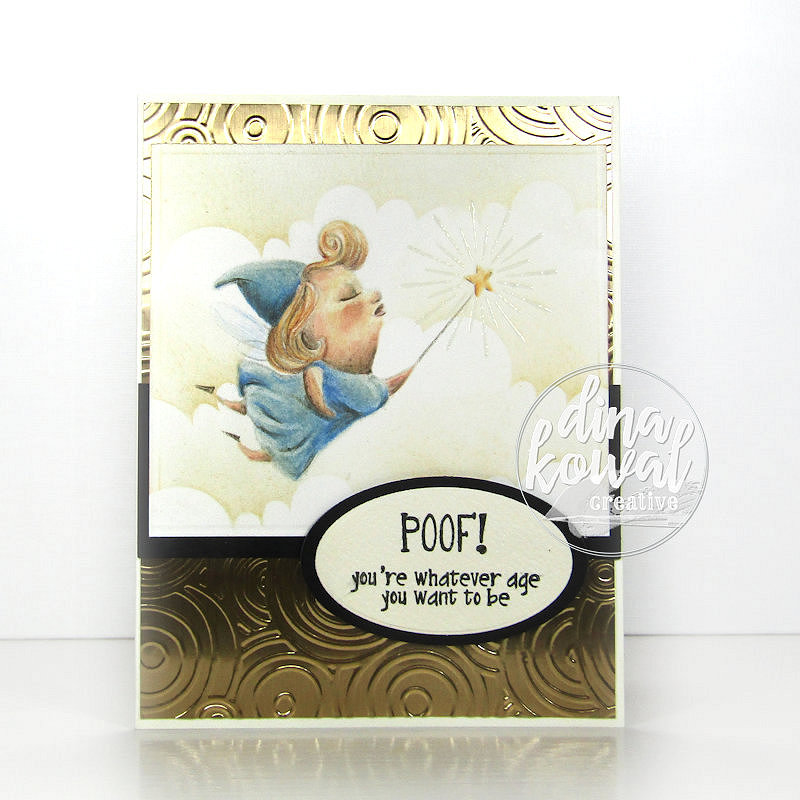
Be sure to check out the other designers' blogs for inspiration - see the I.O. blog for all the links and details! And stay tuned for a NEW RELEASE hop next week - I am sooooooooooo excited about this collection! Here's a peek at one of my favorite images........ meep!


Have a great week!

Thanks for stopping by!


Ideas, Supplies, Machines, Paper & More

Saturday, June 01, 2019

Spellbinders June 2019 Large Die Kit

Today is the release of the new monthly kits at Spellbinders - I've been playing with the Large Die kit, and I have two projects to share!


This month's kit has a lot of elements, so I've made a video that shows those better than a photo post can really explain. There are dies to create a slider card, as well as a set of small dies for building wreaths and other accents. This is the slider card that I made in the video. The sentiment is from my stamp line, and it's HERE; the inside hidden sentiment was made with this mix-and-match set. The scalloped line is stenciled using this frame set.


Here's more info about the kit, and instructions for making the slider card. It's a great base, and can be used for every occasion!


This little tag and bag set are a spin off project using the same card dies!


Before cutting the front and back panels, I scored my cardstock at 2", and made sure that fold line was inside the cutting edge at the bottom so it did not cut.


I cut the side pieces at 3" x 6", and scored down at 1/2", 1-1/2" and 2-1/2", and then 1/2" from the bottom. You can see how those panels are scored and trimmed below.


The 2" flaps on the front and back panels overlap for the bag base, and the sides are adhered in as shown. I cut two of the half circles and adhered them to the inside of the bag for handles. You might want to double them up for a little extra strength.


 The die set is full of small seasonal dies as well as some birthday and floral designs and the "Hi" I used on the tag.


Here's the full kit - so many more possibilities, large and small! I love all those little accent dies.

Kit info is below, so check that out - I'll be back soon with a couple of projects using the monthly Glimmer foiling kit as well!
Thanks for stopping by!

leaf-icon.png Past Club Kits at Member Rates
leaf-icon.png 10% Store Savings
leaf-icon.png Members Only Offers & Deals
leaf-icon.png Earn Creative Rewards for Each Purchase
leaf-icon.png Monthly Inspiration
leaf-icon.png Cancel Anytime
leaf-icon.png Skip Any Month
leaf-icon.png Annual Membership Gift
leaf-icon.png Exclusive Deals 

Wednesday, July 18, 2018

New IO Fall/Winter Release Hop - Day 3 (video!)

The Impression Obsession team is showcasing new Fall and Winter images that are available NOW! You can visit the I.O. Blog all this week for links to the previews and ALL the challenge details. Leave a comment on our designers' posts throughout the week for a chance to win a $25 gift certificate from Impression Obsession! If you just happened on the blog hop because you're a regular reader of my blog, you can find a full list of participants at the end of my post. 


I am smitten with this little penguin - this version of the image is a 3-piece cling set with separate flippers that can be popped and positioned for peeker cards like this, a peek-a-boo pose, or holding something like a die cut or gift card. He was a perfect fit for a square version of the Double Triangle Card, so I made a video to show how that was done. Hope you enjoy!


This would make a great store or show make-and-take, especially since you can make 2 cards at once! 

IO products I used: Peeking Penguin cling set, Warm Wishes clear set (sentiment builders, and smaller penguin and bear images)

**For another bonus project, click over to my Splitcoast gallery to see my sample for this week's tutorial - I used the Peeking Bear set on a cute gift bag!

Be sure to check out these other designers' blogs for inspiration! You're not required to comment on every one, but the more comments you leave, the more chances you have to win! Thank you for visiting me!

Anna @ Sassy & Sweet Notes
Dina @ Dina Kowal Creative
Giovana @ Believe
Ilina @ Creativity Within
Jeanne @ Inky Paws
Karen @ Paper Lilies and Ink 
Kelli @ Stamping with a Dream 
Laura @ Laura's Stamp Art Journal
Vicki @ Summerthyme Studio


Thanks for stopping by!

Saturday, June 09, 2018

Selective Stamping - quick and easy!

Just a quick post today - a few weeks ago I promised a video on how to make this clean and simple silhouette card, and it's done!


I used a couple of simple techniques for selective stamping, or stamping just part of an image at a time. Hope you enjoy!


The Flag Girl Silhouette stamp can be found HERE.

The Celebrating You stamp can be found HERE.

Have a great weekend!

Thanks for stopping by!

Friday, March 16, 2018

Whimsy Stamps' new monthly kit - Paper Door!


Ready for something new and fun? Whimsy Stamps is introducing Paper Door this month! These are monthly product kits full of exclusive and exquisite themed crafty goodies - each month you'll get a chance (between the 10th and 25th) to preview the contents, and you'll reserve only the kits you want - no subscriptions and no minimums. Here's a look at the goodies available in the March kit!


Poof! There is so much sparkle and glitz in there, and the paper selection is absolutely exquisite - I almost hated to cut into some of them! Here are a couple of the cards I made, and I'll share 2 more tomorrow. 


This has to be my favorite of the cards I made from the kit - I stamped the fairy in a light ink and colored her in with colored pencils. The sparkles around her wand are clear embossed, and I used the gold Delicata ink from the kit to stencil in the cloudy background. I love that gold paper - I embossed it with a Darice folder for some extra texture.


For my second card I stamped the other fairy image onto one of the textured papers from the kit, and colored her in with Copic markers, adding a little Wink of Stella for some sparkle on her wings. Not only is the cardstock textured, it also has a coating on it, which made the Copic blending very easy. I used clear powder to emboss the Lattice Background stamp on the curved panel for a little extra something in the background, and that curve was cut with one of the Stitched Border Dies. I love all the little mix and match sentiments in this set, too.

Not only do I get to tell you about the Paper Door kit, I get to give a $15 gift certificate to a lucky winner! For a chance to win, please pop over to the Whimsy Stamps site and take a peek at their new March release, then come back and tell me about your favorite stamp or set in the batch! Make sure I have a way to contact you as well! For another chance to win, check back tomorrow too! I will draw and post a winner Monday evening (March 19) at 8:00 Central time!


Thanks for visiting me today!
Thanks for stopping by!

Wednesday, February 14, 2018

Splitcoast tutorial: Watercolor on Yupo

Yupo Synthetic Paper has gotten a lot of attention in the last few months for its performance with alcohol inks - it's also a great substrate for watercolor! In this week's tutorial over on Splitcoast, you'll learn some of my tips and tricks for Watercoloring on Yupo... and you'll get to learn from some of my mistakes as well.


 Yupo is a tree-free synthetic paper, which is non-staining, nonporous, and has a very smooth surface - it's a lot of fun for a variety of techniques, and if you mess up or want to try something new, you can wipe it off and start over! The paper comes in different weights, as well as different levels of opacity - for my samples I used the heavy weight (144#) white Yupo, which is very sturdy.


I have had this Gazebo Overlook image for a long time and was so happy to see that Whimsy Stamps has picked up the license on it. You can watch a portion of my process in the video below - mostly just the mistakes! I definitely need to revisit this card with the right ink to really show off the image!


I purchased this stamp at Hobby Lobby a couple of weeks ago during their mass clearance sale - so happy to have it in my stash!

Here's the video - let me know if you have any questions!


Thanks for stopping by!

Friday, January 26, 2018

New Spring Stamps from IO - Day 5

The Impression Obsession team is showcasing new Spring images that are available NOW! You can visit the I.O. Blog all this week for links to the previews and ALL the challenge details. Leave a comment on our designers' posts throughout the week for a chance to win a $25 gift certificates from Impression Obsession!


This week I've been playing with my new Layered Marble clear set, and I'm very excited about it! It might be a little confusing or even scary at first glance...


Layered Marble clear set
But it's really quite easy to use, and I've made a video to show you how it works. I love the results on these backgrounds here!


 Here's the video for more information, and you'll also see how these backgrounds were made (they're the 3rd and 4th samples in there):


I paired the backgrounds with some new Valentines dies that weren't available when we made our samples for Creativation - marble is so elegant, and such a great background for wedding cards.


IO products I used: Layered Marble clear set,  Heart Couple Frame die, Life Stuff Sentiments clear set, Bride and Groom Frame die


Be sure to check out these other designers' blogs for inspiration! You're not required to comment on every one, but the more comments you leave, the more chances you have to win! Thank you for visiting me! 

Anna @ Sassy & Sweet Notes
Daniela @ For the First Time

Dina @ Dina Kowal Creative <================ you're here!
Giovana @ Believe
Ilina @ Creativity Within
Jeanne @ Inky Paws
Jenny @ One Krafty Kat 
Karen @ Paper Lilies and Ink 
Kelli @ Stamping with a Dream 
Kittie @ Kittie Kraft
Laura @ Laura's Stamp Art Journal
Vicki @ Summerthyme Studio


Thanks for stopping by!

Wednesday, January 24, 2018

New Spring Stamps from IO - Day 3

The Impression Obsession team is showcasing new Spring images that are available NOW! You can visit the I.O. Blog all this week for links to the previews and ALL the challenge details. Leave a comment on our designers' posts throughout the week for a chance to win a $25 gift certificates from Impression Obsession!


I have some Easter stamps in the new release, and today I have a quick video to share to show how I made this card! This is an inking technique I've used in the past, and I've had many requests for a how-to video. I'll be making more short format videos to accompany my stamps this year, and I hope that will be helpful to you, and especially to retail stores who carry my stamp designs (thank you!). 


Stamps I used: Cross Sunrise, Easter Blessings


Be sure to check out these other designers' blogs for inspiration! You're not required to comment on every one, but the more comments you leave, the more chances you have to win! Thank you for visiting me! 

Anna @ Sassy & Sweet Notes
Daniela @ For the First Time

Dina @ Dina Kowal Creative <================ you're here! 
Giovana @ Believe
Ilina @ Creativity Within
Jeanne @ Inky Paws
Jenny @ One Krafty Kat 
Karen @ Paper Lilies and Ink 
Kelli @ Stamping with a Dream 
Kittie @ Kittie Kraft
Laura @ Laura's Stamp Art Journal
Vicki @ Summerthyme Studio


Thanks for stopping by!

Monday, April 10, 2017

Product Review: Chalkola Markers

I recently was offered the opportunity to review some markers from Chalkola! These are water-based chalk markers meant for non-porous surfaces, such as glass, black and white boards, and plastic. They're not art markers, but I did have a little fun with a canvas project while I was playing. Here's what I know!


The markers came to me in 3 different formats: Platinum Series (wide markers), Premium Markers (medium bullet), and Metallic Markers.

PLATINUM SERIES


These large format Platinum Series chalk markers come in a set of 8 colors, and have a large 15mm flat chisel nib, which allows for 3 different line widths (wide side, narrow side, and edge). The colors are very vibrant. On the packaging, the markers are described as child-safe, water-based, non-toxic, low-odor, acid-free, xylene-free, quick-dry, and long-lasting. These are also marketed as "window markers".

The ink is vibrant and opaque - you'll see in the video how well the colors show up on a dark surface, which is great.  The markers need to be shaken and the tip depressed several times to activate the ink flow, typical of a paint marker. With this size marker, I had a hard time getting a consistent ink flow - my results tended to be a little streaky when working on a vertical surface, while my son experienced drippage and leaking. I activated one marker and set it upside-down to allow the ink to fill the nib completely for just a minute or 2, and there was some leakage in the cap when I opened it.

Despite the claim of the markers being "quick-dry", I found the chalk ink stayed wet for quite a long time... not a big issue, but good to know. If you're working on a compatible surface, a heat gun can be used to speed up the drying process (this worked fine on glass and black/white boards, but I wouldn't try it on plastic).


PREMIUM MARKERS


The Premium markers come in a pack of 10, with a bonus pack of 6 metallic markers (shown below).

The ink is the same as the Platinum markers, but flows from a 5.5mm bullet tip. Like the wider markers above, the markers need to be shaken and the tip depressed several times to activate the ink flow.

These markers were much easier to control, with consistent flow and beautiful, vibrant colors. The ink does require some time to dry.

METALLIC MARKERS


These Metallic Series markers come in a pack of 6, which tucks neatly inside the box above. These markers are ready to go - no activation required. The nib is a 4.5mm bullet tip. The ink in these markers has a different formula than the others - it dried quickly and was less flowy and more durable than the ink from the other markers and flatter when dry. It was also very resistant to rubbing away. These markers aren't available for sale on their own - since they're so different, that might be a good move! 

Here's a quick video where you can see the markers in action!


Here's a clearer look at my mini canvases - the one I did in the video and one I did beforehand for practice (no stencil). these were fun to do, and this was a cool way to get a watercolor effect on a prepared canvas. (These finished canvases are in my store if you'd like to have one of your own!)


CLEANUP

I'm used to another brand of wet-erase marker, so you'll notice I used one in the test for comparison. My understanding of the term 'wet erase' is that water needs to be introduced to the equation for the ink to be wiped away, otherwise it stays put. I didn't find that to be true for the chalk ink - it actually rubbed off with very little effort. If you have a board or project that won't be brushed or bumped, that won't be a problem, but on a menu board in a high traffic area, or on an item that will be handled often, these might not be ideal.


I also found that the chalk markers weren't difficult to clean up, but compared to my usual brand took a longer time to clean up because of the chalky residue that seemed to just spread around with a wet cloth.

I didn't notice any staining with the Chalkola markers, which was nice (you'll see some staining from the other marker in the video). Drips are said to wash out of clothing easily as well.


CONCERNS

--I had trouble with consistent ink flow in the larger markers - it was hard to achieve the sweet spot between streaky and drippy.
--The chalk ink seems to rub away very easily, even when dry.


COMPLIMENTS

--I loved the opaqueness of the inks. They are very vibrant on light and dark surfaces.
--The metallic markers dry quickly and stand up well to being handled, brushed or rubbed.
--no staining!

COUPON!

If you're interested in trying these markers for yourself, I have a code to share!

You can use code 15OFFSTR for 15% your purchase of Chalkola products

Direct (affiliate) links to the products I used: 
Platinum/Window Markers
Premium & Metallic Markers (10+6)

Chalkola has done a wonderful job of getting their products into the hands of a wide variety of bloggers - if you'd like more information, try a google search for more reviews - there are so many out there. 

If you have a product you'd like me to review, please email me! Have a wonderful week!
Thanks for stopping by!