Showing posts with label Peerless Watercolors. Show all posts

Wednesday, May 18, 2016

Splitcoast Tutorial: Stamped Masking

Lori and I put our heads together for this week's tutorial over on Splitcoast... it's a fun and easy resist technique called Stamped Masking.


I used stamps from The Cat's Pajamas for my sample - I did a light wash with Gelatos on the panel first, then stamped the sunflower image from the new Sketchy Flowers set using masking fluid. When that was dry I did another wash with liquid Peerless watercolor and some QoR paints, then waited for the panel to dry and rubbed the masking fluid away.


The bear is watercolored with the same paints I used on the background. And I used an eyelet!


Hope you'll try this one - I have another sample I'll share tomorrow. Thanks for visiting!
Thanks for stopping by!

Wednesday, April 27, 2016

Splitcoast tutorial & Starburst backgrounds

This week's tutorial over on Splitcoast is an upcycled Cardboard Roll Album - it's a great way to use up those empty TP rolls, and make a unique themed mini book. I didn't get to make a sample this week, but please be sure to check out our new author Areli's sample books - they're great!


In the Inkling newsletter this week I answered a question about making Starburst backgrounds, so here are a couple of cards I made as I was clarifying the steps in my mind... the House Mouse images came from Joanna Sheen's webstore (they're discontinued now), and the sentiments are from Sweet 'n Sassy Stamps.


 Our Artist in Residence answers your questions:
Q: Deirdre wants to know: "How do you make a starburst background?"
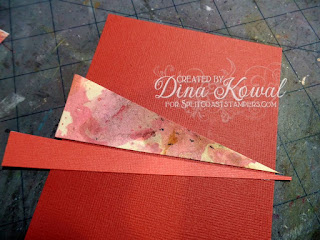
A: I start with a pile of rectangular paper scraps, and cut them from corner to corner to create long triangles. The width of the scraps doesn't matter, but they need to be at least 4-5" inches long. 

I pick a point on the card, usually to one side, and glue my first wedge down across the card with the point of the triangle at or just beyond my focus point (it doesn't have to be on the edge - it can be anywhere on the card, really). 


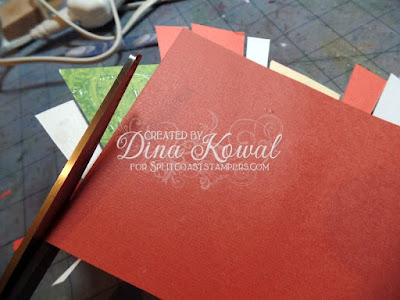
From there I work out on either side of the first wedge, gluing down other wedges and leaving a small space in between each piece. You can match up the sides, but leaving a space allows for a contrast layer to show through, and gives you a little margin for error in case your cuts aren't perfectly straight. 


When the space is filled, trim off the overhanging edges. 


That's it! It's a great way to add drama to a card or really highlight a small image.


 If you're not a subscriber to our weekly newsletter, you can click here to find back issues and sign up - the newsletter is published every Wednesday and the Splitcoast team packs it full with a new tutorial, tips, reviews, coupons, and links.

Hope you're having a great week - thank you for visiting me!
Thanks for stopping by!

Thursday, March 17, 2016

Impression Obsession DT Challenge: Easter Fun

The Impression Obsession team's challenge today is to create a project for Easter! Yesterday I shared the cute Slatted Basket tutorial that we ran at Splitcoast, and I thought a mini one would be fun to try. This one has a 2" base, and I made it from a 6" x 6" piece of double sided cardstock, then embellished with some cute die cuts.


I scored the 6" piece at 2" and 4" horizontally and vertically, and then scored 3/8" from each edge, and followed the directions in the photo tutorial for cutting and assembly. I used a 2" matboard Art Square from Inchie Arts for the base, and it's super sturdy. This is half the size of the tutorial model, and it's a great size for a little treat, a votive candle, or whatever!


(My kids love it when I stage photos... they were waiting behind me to finish photographing so they could have the gumball eggs! Aren't those cute though?)

Dies I used: Bunny with EggWheelbarrow

Be sure to check out these other designers' blogs for inspiration -

Anna @ Sassy & Sweet Notes
Daniela @ For the First Time
Dina @ Mama Dini's Stamperia ---- you're here
Jeanne @ Inky Paws
Jenny @ One Krafty Kat
Karen @ Paper Lilies and Ink
Kittie @ Kittie Kraft
Vicki @ Summerthyme Studio

Remember you can enter these challenges too, using your Impression Obsession stamps! See the I.O. blog for all the details - you might even win a $25 gift certificate!! We'd love to have you join us.
Thanks for stopping by!

Saturday, January 09, 2016

Art Colouring Books - review

We're all aware of the world's sudden realization that coloring is good, cheap therapy... finally figuring out what we've known all along! I love the recent adult coloring book surge. I was honored to receive two brand new editions of the Art Colouring Book series from Katy Sue Designs to play with and review - these are beautiful volumes featuring original artwork by Sandra Rushton. Being released at the CHA MegaShow today are Nautical Adventures and Le Shoe!  I'm looking forward to seeing the Katy Sue Designs crew in person this weekend. 


A little about the books themselves - you can see the size and thickness of the books here... The pages are beautiful heavy weight cardstock that can be removed from the spiral and trimmed to 8" by 8".Each book contains 70 coloring pages, some shaded artwork, some line art, and some patterns with similar themes... there are 10 themed mini collections in each book.  You can see the difference between the shaded artwork and the line art below.


The designs, which are printed on just one side of each page, could be used for scrapbook or smashbook pages, cut out and framed, or incorporated into other cards or crafts. I love the way the spiral binding lays flat for easy coloring.  The nautical book has a strong Asian theme, which was a lot of fun for me as well.


Of course I had to test a few different mediums out! I started with Prismacolor Pencils - my hand cramps so easily these days, so with all these little details, I really appreciated the softness of these old favorites. The Prismacolors were my favorite medium to use of all that I tried, and it was so much fun to really get into the small areas to bring out the intricacies of each section. I used a Caran D'Ache Full Blender to smooth the color in some areas, and that worked very well. Mineral spirits can also be used with good results, and no bleed through.


The next medium I tried was watercolor, and I used Peerless sheets for this piece. I didn't take the time to really go into the details but I may do that with watercolor pencils or some markers at a later time... I really was more interested in seeing how durable the paper would be with water. The paper held up surprisingly well to the water, with no bleeding of the ink. Warping was pretty minimal, and flattened with the weight of other pages after it dried.


For this shoe, I used a variety of watercolor markers (Zig Clean Color, Akashiya Sai and Distress), and was a little less impressed... I'm used to using these markers on watercolor paper where the color stays on top of the paper and blends well with water or with another marker applied over the top.


I was able to do some tip-to-tip blending with the markers, and also was able layer the colors for a blended look, just not necessarily the look I was going for! :) Here I used a white Posca pen to add some highlights - that worked well. I don't normally color like this with these markers and I probably wouldn't again, but... that is why we do test pages! If you normally color with water-based markers hopefully this info helps. Distress markers behaved the best for me.


For a final test, I used alcohol markers, and was pleased generally with how that went, except for some bleeding in the areas that I overblended... again... I'm used to blending a little more heavily on cardstock that holds the ink in place, so I did have a few issues in some areas that were more my fault than the fault of the paper. :) There's more evidence of the paper working than there are areas that bled.

The googlie eye just needed to happen there.

Here is the back of the page so you can see that there is significant bleed-through. A piece of cardstock or a teflon sheet between the pages keeps the ink contained to the back of the page, and not affecting the pages under it. Not a problem!


These books are retailing at $15, and you can get them directly from Katy Sue Designs or via the Amazon links I posted up top. I hear there are more themes to come as well!  If you have questions, need more inspiration, or would like more peeks inside these books, you can find Art Colouring Books on Facebook - please tell them I sent you. :)

Thanks for stopping by!

Wednesday, December 30, 2015

Splitcoast Tutorial: Texture Pressing

Today's tutorial over on Splitcoast is a simple mixed media technique called Texture Pressing... I have to say, after a few weeks 'off', I needed this little sweet kick back to creating. The technique is so fun and easy!


This is my finished card - the focal image is one I just got from Unity Stamps (one of my stocking stuffers, which I stuffed myself!). I used Peerless watercolor sheets for the coloring, with a tiny bit of pencil for the deepest shadows and hair.


I remembered to take a picture of the background before I assembled the card - this was a background that I had in my "finish" stash, made with a variety of watercolor powders. I spread some modeling paste thinly across the corner, inked up a flourish stamp with gold Delicata ink, and stamped into the paste.


As Kyra says in her video, it's a beautiful way to add texture without adding bulk. I love the sparkle of the gold ink, too!


If you're needing a creative kick in the pants, I hope you'll try this simple technique. I love the way it brightened up my background.


I decided today that through the next year, I wanted to have a set of weekly goals - make art (and by that, I mean paint something to sell), share art, finish art (make a card from my stash of backgrounds and prestamped images), and teach art (via a review here, a tutorial or video, or work on an online class). I'm going to make a stamp for my planner so I'm sure to check off all the boxes each week.

Do you set creative goals? I'd love to hear about them.

Happy Wednesday! xo
Thanks for stopping by!

Wednesday, December 02, 2015

12 Tags of Christmas with a Feminine Twist - Color challenge


I'm so honored to be the guest designer for today's edition of 12 Tags of Christmas with a Feminine Twist, hosted by Ellen Hutson... be sure to visit the Classroom blog to see all the entries - there's quite an impressive team!


Kittie is the hostess of today's challenge, and this is the color board she chose - I love the combination of the traditional Christmas colors with the warm greys:


I watercolored the Ornament Collage image with a combination of Brusho and Peerless watercolors, then added details with Spectrum Noir pencils and some gold acrylic paint.


To create a little dimension on the ornaments, I traced the edges with a stylus, then flipped the panel, and rubbed inside the outlines with the rounded end of my bone folder.


It's a small detail but it adds just a little lift - here's a closer look.


The seam binding was dyed using 2 colors of Brusho powders, and I made it sparkly by mixing in a little gold acrylic paint as well. The sentiment here is from one of my newest clear sets from Impression Obsession - Winter Silhouettes.


Thank you so much for visiting me today - be sure to click over to the Classroom for more challenge and product details!
Thanks for stopping by!

Saturday, November 14, 2015

Holiday Blitz Tutorial: Pop-Up Presents Card

Today's Holiday Blitz tutorial is such a fun one, and I've been wanting to feature it for a while - I was so thrilled to realize how EASY it is, since foldy projects tend to undo me... :) It's a Pop-Up Presents Card.


This is the front of my card - I had to HAD TO use this gorgeous bird set that my sweet friend Giovana  sent to me - it has been on my Crafter's Companion wish list for so long.  I watercolored the bird with Peerless paints on Canva-Paper - that is a bit different to work on than watercolor paper, and I really like it. It's not really absorbent, so you have a little longer time to work with colors, and they stay so vibrant on the surface.


Here's the inside of the card - isn't that a fun surprise? It's actually just a few simple cuts and scores. So easy.


It's a fun way to use up scraps, too! And it's useful throughout the year for birthdays and other occasions as well.


Join us all this week for beautiful holiday tutorials during our Holiday Blitz event!

Thanks for stopping by!

Monday, August 17, 2015

Brush markers and Peerless watercolors

I had a little fun this weekend playing with watercolors - I thought it would be fun to stretch the color range of my Zig Clean Color Real Brush Pens and Akashiya Sai markers by using them to pick up color from my Peerless palette. The Zig markers are a real brush marker (bristles, not felt tip), so they're the perfect format for this type of palette blending.


I started by stamping the orchid image onto a 4" white matboard Art Square from Inchie Arts. For each background section, I picked up some light blue ink with the tip of a light green marker, and blended out the color. I love the dimension that adds to an otherwise 'flat' line image.


On the flowers, I used the light peach Sai marker with water to create a solid base layer of color. To add shading, I used the same peach marker to pick up rose and purple inks, layering colors until I got the look I wanted. The ink flowing through the pen created a nice blend with the added color.


Here's a closer look at the flowers (you can click on the photo for a larger view).  Stamps I used (all dkdesigns from Impression Obsession): Stained Glass Orchid, Live Life, CAC Starburst


Have a wonderful week!

Thanks for stopping by!

Click here for more Inchie Arts products!