Showing posts with label StencilGirl. Show all posts

Monday, February 20, 2017

Weekend projects!

Just wanted to share some of my projects from this weekend! I needed to restock my stash of thank you tags - these get tucked in with every order from my webstore. They're so much fun to make and each one is unique... it's so fun and relaxing to just make a stack of gel prints!


Most of these are posterboard tags but there are a few manila tags mixed in... I used just 3 colors of paint (white, lime green and a bright blue), but there was a little mixage on the Gelli Plate, so there are some in-between greens in there as well.


Every once in a while I pulled a print to create some backgrounds - these will be great when I start working on card samples for my upcoming summer release!


I also wanted to try out these Thickers rulers from We R Memory Keepers - there is a straight ruler with a grid and centering guide, and also these curves, in scrapbook and card sizes.


I cut out some letters from Contact Paper for masking, and lined them up on the ruler...


...then you press the tops of the letters onto the project surface, and tip the ruler out from under them. Pretty cool product! They would be great for placing die cut letters or other shapes in a row, arch or curve - I'm looking forward to playing with them more.


I did a little gel printing on my wood tag, and then pulled the masks away - so fun!

Here's one other project I finished up this weekend - I had a few more of these wood pendants done, but had to wait on the cording, and hadn't gotten around to putting them together yet. These are also in the store, and here are a few of my favorites!


I hope you have a creative week! I have mostly been drawing and working on stamp designs for a March 1 deadline, so it was nice to have a more colorful break this weekend!
Thanks for stopping by!

Tuesday, September 27, 2016

StencilGirl/Impression Obsession Blog Hop!

So fun again to be joining the Impression Obsession designers in a product swap hop with StencilGirl Products! I hope you've been inspired by the projects that have been shared so far - today is Day 2, and more projects will be shared tomorrow! You can find all the links on the StencilGirl Blog, and you'll want to because.......... prizes. (Keep reading to find out how you can win!)

We're just a few weeks away from our closing date, so I wanted to make something useful for the new house - I found this little 8"x12" Hampton Art easel that has a chalk board on one side and white board on the other  - it's a great countertop size for a menu or to-do list and it's just so cute! Magnetic too!


I started by masking off the right side of the board, about 2" in, and painted a mixture of gesso and craft paint as a base.


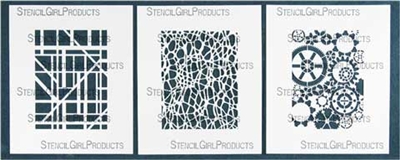
Set #1 Rafters, Web, Gears Stencils
When that was dry, I used the middle stencil above to add some texture randomly with a darker turquoise paint. The next layer was stamped with French Letter and  Dot Border in Stazon ink. I stenciled some of the gears at the bottom of the area, but my brush was too wet, so it squished a bit....


 I dry-brushed that area out a little bit, then used the same stencil to sponge a little Stazon ink for a little more detail and depth. I stamped the Porcelain Crackle randomly through the area to add a little more texture.


I thought this sentiment would be fitting for a daily reminder to keep my chin up when all the 'to-dos' don't get done! :) It's called More Than Your Mess, and it's from my stamp line at Impression Obsession.


Now for the fun stuff!


 Both StencilGirl and Impression Obsession will have two chances to win a $25 Gift Certificate - 4 prizes total! The more blogs you comment on, the more chances you have to WIN! (One comment per blog please.) You can visit the StencilGirl blog for each day's listings. You have until Friday, September 30th at 11:59PM Central Time to leave your comments, and winners will be announced on StencilGirl's Facebook page on Sunday, October 2nd.

If you missed yesterday's hop, here are those links, along with the designers who are participating today... please hop over to Karen Amidon's blog next!


September 26

September 27


September 28
StencilGirl Talk

Thank you for stopping by!
Thanks for stopping by!

Tuesday, January 26, 2016

Inchie Arts hop with Stencil Girl!


So excited to be joining the Inchie Arts girls in a hop with the StencilGirl crew! What a fun combination of products in the hands of amazing artists. :)  Wait till you see the full hop list! And check this info out:

We'll be picking one lucky winner to receive a $25 StencilGirl Products Gift Certificate and 1 package each of White 4", 3", ATC (2.5" X 3.5") and Swatch (2" X 4") size Art Squares!

All comments left on the hop list participants’ posts will be entered. Winner will be announced on StencilGirl Product’s Facebook Page on January 31stOne comment per blog. Comments close on January 30th @ 11:59PM Central.


I wanted to share a technique, so I played around with both products in my new Big Shot Plus - that was a birthday present that I've been having fun with - I'll share more about it later, if you'd like! My regular size Big Shot was getting loose, so it's nice to have a new machine in addition to the benefits of the larger size. Anyway! Kristen Powers of RubberMoon sent me some of her gorgeous stamps to play with, so I'm featuring those today (you'll see her artwork on the hop tomorrow!). Stamps I used: ML201 Beautiful Mistakes, KP5021 Make Art


My card base is a 4" black Art Square. I embossed the panel with the stencil, layering the Big Shot base with a cutting pad, matboard, stencil, cutting pad and 3-4 cereal box shims. Here's what that looked like when I worked with the white square.


Here's the finished square - it's not a deep impression, but it's enough for brayering or sponging, or scraping acrylics, which I did on both cards here.


My second card was so much fun to make - I scraped the light blue paint across the Art Square with an old gift card, then used my MISTI to position the girl stamp (RubberMoon - ML202 Dreamer Girl). I heat set the ink, painted over it with acrylic paints, then restamped the image to redefine the lines.


As happens often, I sort of lost the texture under the layers... You can see, though, in the corners, how the texture picks up in the areas where I rubbed ink in.


The 'speed 5 mph' is a rub-on from 7gypsies... I've been dragging a bit the last few weeks so it seemed appropriate! I love this girl's sweet face.


The StencilGirl products I used on my projects are L352 Deconstructed Floral Bouquet and S217 Rose Window Stencil. They're beautiful!

Please visit these other artists who have projects to share for the hop:


January 27 


And please visit our sponsors so you can check out their amazing products:


Thank you for stopping by! xoxo


Thanks for stopping by!