Showing posts with label Stampendous. Show all posts

Friday, May 03, 2024

Spellbinders feature - All the Sentiments collection by Stampendous

You can find me over on the Spellbinders Blog today with a sweet birthday set! There are several sets in this month's release featuring sentiments, and a really clever envelope die set with a gift card pop up element - I used the envelope base to make a box as well.

One of the stamp sets has a bunch of beautiful sympathy sentiments for loss and difficult times - this card didn't fit with my other projects, so I'll share that one here instead.


The rounded rectangles I used here are part of the envelope set I mentioned. For my card base, I lined the die up with the top cut line just outside the fold. I cut the watercolor paper panel with the smaller rectangle. I stamped the floral image first and used a Karin marker to dot in the blooms, misting the panel so those colors would bleed out (I have a tutorial for this technique HERE). After that dried, I finished painting, drying between layers. Below you can see all the layers in the blooms - I dotted more with the Karin marker then moved to paint pens to create some contrast.


The watercolored panel needed 'something' to break up the white space, so I ended up cutting a narrow strip from the middle to allow the base color to show through.

The rest of this April collection lends itself well to birthday cards, gifts and more! I hope you'll check out out the release and the rest of my projects!

Spellbinders products:
Karin Markers

Thanks for stopping by!

When you shop through the affiliate links used here, the company sends a small commission my way at no cost to you as thanks for the referral.
It's a lovely way to partner with these companies that mean so much to our creative community. Everybody wins!


Ideas, Supplies, Machines, Paper & More

Friday, September 15, 2017

Fall Coffee Lovers Blog Hop - Super Sponsor!

It's time for the Coffee Lovers Blog Hop, and I'm so excited to be a Super Sponsor again! Keep reading to find out how you can win one of 2 mini canvases or a domed glass art pendant, and receive a special coupon code for my online store! 


In case you're new to my blog, I'll tell you a little about me.  I adore Winnie the Pooh, randomly burst into song, and collect fun socks. I'm a working artist (see my commissioned pet portraits HERE), have my own line of stamps, and I'm the Artist in Residence at Splitcoaststampers, among other roles behind the scenes. I love to create, and I love sharing what I learn in the process. I have an online store where you'll find prints of my original artwork as well as jewelry and other items. I've been blogging here for almost 11 years!


This little Gruffies image (Bearly Working) is full of empty coffee cups - this September has been really busy for me, so I can relate to his little scene! The main panel is watercolored, and the background was an experiment with ColorBox sprays.

On to the fun stuff!


For a chance to win prizes in our hop this week, you have to play along! Head over to the Coffee Loving Cardmakers blog for all the details, and to link up your fall coffee, tea, or cocoa themed project! 

Two lucky winners will receive a hand painted mini canvas for participating this week, and one winner will be getting a 
domed glass art pendant You can find these and more coffee (and other!) themed gifts in my online store - and to thank you for hopping and visiting today, you can use coupon code COFFEEHOP for 20% off your entire order through the end of the hop next Friday!


Thanks again - enjoy the hop, and go make something pretty!

Thanks for stopping by!

Friday, March 24, 2017

SPRING Coffee Lovers Blog Hop!


It's time for the Coffee Lovers Blog Hop, and I'm so excited to be a Super Sponsor again! Keep reading for the prizes and a special coupon code for my online store!


I watercolored this fun little caffeinated scene from Stampendous for the occasion ... I used QoR watercolors along with some Zig and Distress markers for the details and shadows. The sentiment is from my stamp line at Impression Obsession. The paper strips I used for the background panel were on my desk from a few other projects - I love putting random scraps together to make a panel like this - such a fun way to build a color palette!


For a chance to win prizes in our hop this week, you have to play along! Head over to the Coffee Loving Cardmakers blog for all the details, and to link up your spring coffee, tea, or cocoa themed project! 

These 3 handmade pendants are up for grabs as prizes this week! You can find them and more coffee (and other!) themed gifts in my online store - and to thank you for hopping and visiting today, you can use coupon code COFFEEHOP for 20% off your entire order!


Thanks again - enjoy the hop, and go make something pretty! xoxo


Thanks for stopping by!

PS. I linked up to the current House Mouse Challenge (#237) too, just for fun!

Friday, November 25, 2016

Mix-Ability Challenge - ATCs

It's my turn to host the Mix-Ability challenge over at Splitcoast! This week marks our 200th challenge - how cool is that?


It's a great time of year to create in bulk, so my challenge is to create a full sheet background and then cut it into 10 trading card size pieces to use for tags or inserts. Here's the template I used:


I pulled out my Gelli Plate to create a base of color, using a limited palette of acrylic paints, some snowflake masks and stamps, and some text and texture stamps. When that was dry, I sprinkled white and silver embossing powder randomly on the panel and heated it from the underside. Some of the powder caught the wet ink around it, so I have some silver snowflakes and white script.


I cut that panel into 10 ATCs and it felt a little flimsy, so I ended up trimming each piece down just a little and backing it with Neenah cardstock. The die I used was free with an order from Taylored Expressions - I cut those from label paper so I didn't have to fuss with adhesive.

These will make nice additions to holiday orders from my store, and speaking of my store - I'll have a coupon code just for blog readers tomorrow for Small Business Saturday! Be sure to come back and shop. :)


Thanks for visiting!
Thanks for stopping by!

Sunday, May 08, 2016

Mix-Ability challenge: Fluffy things

Quick post today for this week's Mix-Ability challenge! I  happened to have this House Mouse image stamped on a 3" Art Square when +Jeanne told me this week's challenge, so I'm glad it worked out! It helped me clean my desk, and I'm as excited as this little mouse to be ALMOST DONE cataloging my stamps! I think everything is indexed - I just need to move my dkdesigns stamps to boxes from binders, and update the CD case labels for the sentiments. YAYYY!!! I can't even begin to count the number of crafting hours that have been used for this massive organization project. But - it's worth it!


This mouse is from Stampendous... I just purchased a couple of their unmounted stamps to try, and I have to say I'm not a big fan of their cling vinyl system... but I'm happy that they've kept the HM licensed line alive!


I started off by laying my Art Square into some misted Distress inks, then watercolored the base colors in. For details, I used Coloursoft pencils and a white Posca pen.


Hope you're having a great weekend! Happy Mother's Day!
Thanks for stopping by!

Monday, June 08, 2015

Stampendous Hummingbird

Today I wanted to share another sample I made for the Latch Card tutorial I shared last week. So many stamp sets come with smaller accent stamps, and this is a great way to incorporate them as a card element and fun closure.

When I was at CHA in January I swung by the Stampendous booth and fell in love with several samples made using 
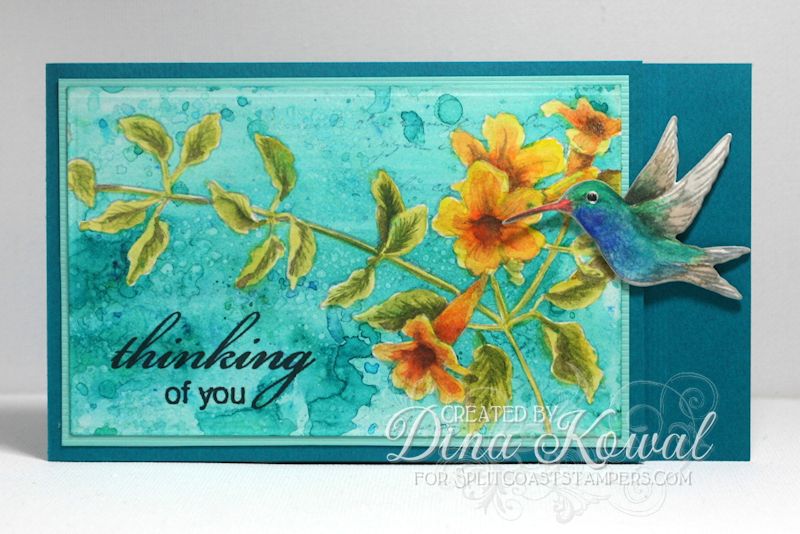
this hummingbird set... I love the artwork and especially love the large format. There's also a set of coordinating dies that match the 2 hummingbirds and 2 of the blooms in the floral image.


To make the card I stamped the floral image on hot press watercolor paper in a light grey ink, then masked the image using masking fluid. The background is done using Magicals from Lindy's Stamp Gang - this is a new-to-me product that is a lot of fun... it's a water soluble pigment powder mixed with a little bit of mica shimmer. They're similar in concept to Brusho and Color Burst crystals, but a much finer powder and beautiful range of colors and sets. I sprinkled powder onto a craft sheet, misted with water, then laid the panel into the activated color several times to build up layers. Hint: drying in between layers allows the colors to have more variation. Spritzing dry color with clear water gives the lighter speckled look.

.
When the panel was completely dry, I removed the masking fluid and then painted the floral image with QoR watercolors. The hummingbird image was also painted with QoR paints, then brushed with a little wet Magicals for a tiny bit of sparkle. I used this sentiment because it fit the space best - it's and old one from The Angel Company.

I die cut the hummingbird to use as the latch of my card - you can see how closely the dies cut to the outline of the stamped image - they're really tight and a great fit! I layered the painted image with 2 other die cuts to give it more stability.


I stamped the flowers on the inside too (MFT Grout Grey is a beautiful pale grey for a watermark look.) I love how the hummingbird shows on the inside too!


That's all I know! For those who are waiting for more items to be listed on my sale page, it's taking longer than I expected and I'm sorry for the delay. Keep an eye there in a couple more weeks for flat rate boxes of crafty goodness, and Touch Markers!
Thanks for stopping by!