


Splitcoast Tutorial: Stencil Reflection
Today's tutorial over on Splitcoast is one I shared on my blog back in March for a blog hop with Penny Black. If you missed it then, or just need a refresher course on Stencil Reflection, I hope you'll check it out!
This week we're welcoming a new Platinum Partner Company - Lili of the Valley! You can keep up with their latest news in their brand new shiny forum. Bridget sent me one of their stamps, and I couldn't wait to color him up in celebration. I used a variation on the stenciling technique to create a little shadow for this sweet little guy with a rough cut reverse mask - here's what that looked like:
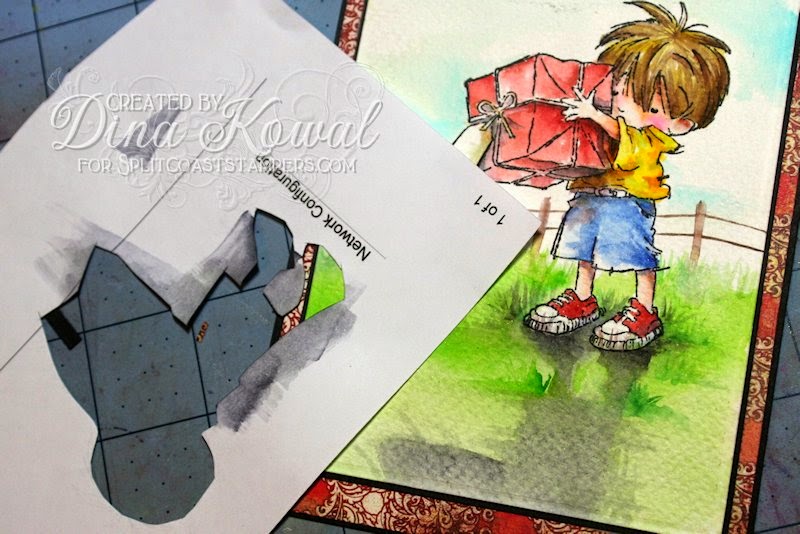
...and here's the completed card. I cut around 3 sides of the little gift tag so it could pop up at an angle - I love the dimension that adds to cards!

To color the scene I used my new Peerless watercolors, so I wanted to share a little bit about those! I've had them for a few weeks but haven't had a real chance to play with them until today. They are certainly vibrant - with any new coloring medium there's a learning curve, though, so I'll need some more play time with them to really get to know all their fun properties. I went in with a stamping friend to get all the available colors (there are 61 altogether, in 3 separate sets)... this is the assortment, and the vintage sheet music they came wrapped in (so cool!!).

The colors in the Peerless Watercolor system are made with the same mineral recipes that have been used since 1885, and they're presented on sheets of paper fabric - it's such a cool concept. Just a slight touch of a wet brush to the papers will activate the color, and they are super transparent when put to watercolor paper. The pigment has great motion for wet-into-wet painting.
There are a variety of systems being used to store these pretties - most systems I've seen involve a binder or notebook. I really wanted to be able to see all the colors at once, so I upcycled an empty pencil tin and made a gridded watercolor paper insert that would accommodate all 61 colors in small 1" swatches.
Here's what I started with...

...and here is the filled-in tin! (By the way, if anyone would like to use this system and you'd like a copy of the color map shown under the tin below, just let me know!) I love that it's compact and portable, with all the colors showing at once. Click on that picture to get a closer look at some of the surfaces of those swatches - they are so interesting!

Of course, I couldn't leave the tin un-arted - I used a combination of gel printing and collage to cover the labels on the front and the back. The sheet music wrapper was torn, so I didn't feel bad tearing a few pieces to collage in with gel medium, along with the logo sticker that held my order together. By the way, the packaging of the paint sheets is identical to the first publishing, and it's a treasure in itself.


This is fabulous. Thanks for sharing. I hope you have a blessed day.
ReplyDeleteBeautiful card! I love the popped up tag and of course the reflection is amazing. The Peerless Watercolors look fascinating and I love that you have them in a tin! The tin cover is stunning and I love vintage looking packaging.....that would be reason enough for me to buy them! :)
ReplyDeleteLove this image, and how you colored. I am impressed with the Peerless water colors, an on my wish list. sure would love to print a copy of your under the tin sheet. I too like to see the whole color choices. For my colored pencils I made strips of each color with pencil no, color name and then pencil color, covered with clear tape and then added to a wring for easy comparison on my art work. so I know I would love the under tin sheet. thanks so much.
ReplyDeleteGreat post on the Peerless colors. I too love using them. I agree the color is great and like how easy they are to use.
ReplyDeleteYour card is darling, in fact like all the projects!!! Thank you for sharing them with us.
Fabulous coloring as always but I absolutely LOVE the shadow created with the stencil. I've been eyeing the Peerless watercolors and would totally like to have a copy of the grid you used. One of the things I was struggling with was storage/usage - your altered tin is perfect and just what the craft doctor ordered lol.
ReplyDeleteWhat a great way to see all your color swatches at once! Love the card!!! TFS
ReplyDeleteJan
Fabulous! I love this idea. I have been humming about diving into peerless watercolors. I can't find them locally, so I have to order them. I love your storage! Thanks for the great idea!
ReplyDeleteLove the card first and foremost. I wold love the color chart thingie. I have some Peerless and need to add more. Would it be a pdf or document file?
ReplyDeletekren dot kurts at gmail dot com
I can send you more info if you need it. Thanks! You're the best!
Dina, I see that you put your Peerless palette into a pencils box. Will it fit inside with the pencils in there as well? That would be great.
ReplyDeleteAlso, do you have a tutorial on using a gelli plate? I just got one.
kReN@http://afourthlife.blogspot.com