Showing posts with label Gina K Designs. Show all posts

Friday, June 12, 2020

Spellbinders June Large Die Club Kit!

I have some Spellbinders club kit projects to share for June! This month's Large Die Kit features two gorgeous abstract geometric frames - they can be used alone or layered for a beautiful modern look.


A few months ago during a hard time, I received a very kind gift from a friend in the form of a beautiful and encouraging stamp set... I love stamps, of course (!) and rainbows, and the timing was just so perfect - it meant so much to me. It's been tucked away for a little while, in a pile of USE THIS SOON items, and the hand-lettered sentiments were a perfect match for this die kit! And it happens that this friend needs a pick-me-up herself now, so... it's time. Here's the full set:

Butterfly Reflections Ink | Gina K. Designs


I started by taping down a panel of watercolor paper, then painted horizontal stripes with a 3/4" brush using my grid mat as a guide. I cut the frame out of the center of the panel, and also cut two frames from another watercolor panel. I love cards that keep creating themselves - you can see I used the white panel and frame on the rainbow panel, and the rainbow frame on the white panel! A two-fer.


The frame dies also come with some floral accents, all with a very modern feel. For some reason this rainbow frame inspired a beachy design and the surfboard from the Truckin' Through the Seasons set wanted to join the party! That pile of white-on-white greenery has a Hawaiian feel to it - I think that's what inspired me.


The greenery and floral stamps are grouped in twos on the actual dies, and for my third card I noticed that one branch die was positioned well to use as a cutout. I cut in from the edge of one of my watercolor panel cutouts, then cut another panel to sponge with gradient inks.


I cut a frame from copper cardstock, then used some copper acrylic ink to splatter the framed piece and base panel. Such a fun card to make!


Here's the full set - I don't usually gravitate to this modern look, but I had some fun with it! I hope you're inspired too. By the way, the larger frame I used is a single piece (two cuts are shown below so you can see how they layer). The smaller frame cuts as shown.

Spellbinders posted their big Summer Super Sale this week - if you love great discounts, be sure to check this one out (if you are a club member or join up, you can get an extra 10% off those sale prices too!)!


Thanks for stopping by!

Here are the club details, if you're not a member yet! 
My favorite perks are the extra sales and the 10% discount on the Spellbinders site!

leaf-icon.png Past Club Kits at Member Rates
leaf-icon.png 10% Store Savings
leaf-icon.png Members Only Offers and Deals
leaf-icon.png Earn Creative Rewards for Each Purchase
leaf-icon.png Monthly Inspiration
leaf-icon.png Cancel Anytime
leaf-icon.png Skip Any Month
leaf-icon.png Annual Membership Gift
leaf-icon.png Exclusive Deals 

Tuesday, July 09, 2019

Impression Obsession Summer Die Release Day 2

A few more samples today using dies from the  new release over at Impression Obsession - there are some really fun new summer designs to choose from! Go take a peek if you haven't yet - I'll wait! 

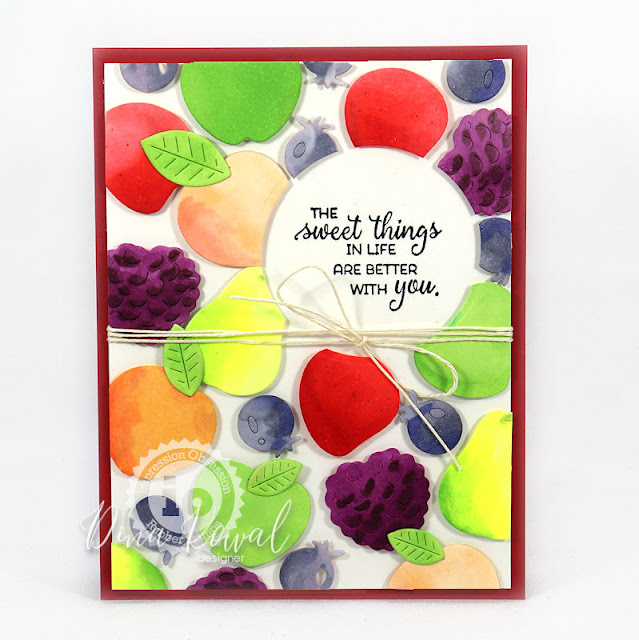
Today I have a couple of samples using the Jam Jar Fruits die set - these fruits are sized perfectly for the label on the Jam Jar set I shared yesterday, but they're also just a great size for little clustered scenes, or for backgrounds! I've been wanting to try a technique that Jennifer McGuire shared where she creates a floating frame - I didn't watch her video before I made my card, but I ended up with the same effect - the only thing I did really differently was to trim my edges after I had placed the die cuts on the card instead of before - I wanted to give myself a little room for error in placement. 


I  used the circle die for reference and arranged the fruit around it, then laid a piece of  Press'n Seal Wrap over the panel to hold all the pieces in place. I moved the die to the top of the Press'n Seal and ran the whole piece through my die cutting machine. (Just a note here: Jennifer was able to get 2 backgrounds by filling the background and using the cut out on another card. I just wanted a small opening, so I didn't think about doing a second card. Next time I'll give that a try. )


With the die cuts still in place, I added foam tape to the back of each piece, and then adhered them all at once to my stamped card panel. 


The die cuts here were cut from watercolor paper and colored with Copic markers. Such a cheery background!

One more Jennifer-inspired card with the same die set: 
DIE828-V Jam Jar Fruits
MC670 Berry Sweet clear set

The video that inspired this card is HERE but I didn't follow it very closely at all - just was inspired by the idea of using smaller die cuts with a wreath builder template. I positioned the first berry of each type with a hinge of washi tape, then used it to position each other berry before finally gluing it down. The berries are cut from colored cardstock, and brushed lightly with ink for shading. White highlights were added with colored pencil and a white Pitt marker.


If you'd like to see more projects, head over to the IO Blog for more links! Also - leave a comment on this post for a chance to win - four winners of $25 gift certificates will be picked from the comments on all the designers' blogs today and tomorrow! Comments will be open until Sunday July 14th at noon CT and winners will be announced on Tuesday July 16th.
Thanks for stopping by!

Wednesday, March 27, 2019

Splitcoast Tutorial: Note Card Clutch

This week's tutorial over on Splitcoast is a really neat fold for a notecard presentation. This Note Card Clutch holds quite a few A1 cards (3.5" x 5") and would make a nice little gift! Here's mine:


For my tag and the card set, I used stamps and the mini template from the Gina K. Designs Wreath Builder collection - the mini wreath is a perfect size for a little corner accent like this!  The rose die on the tag is from this Spellbinders set.


Have a lovely week!
Thanks for stopping by!


Ideas, Supplies, Machines, Paper & More

Wednesday, March 06, 2019

Splitcoast Tutorial: Die Debossed Watercolor

This week's tutorial over on Splitcoast is one of my favorite die techniques, Die Debossed Watercolor. I've shared some of my samples here over the last few weeks!  


For my video sample I used this gorgeous rose die from Spellbinders - this set is only available for a limited time, so grab it if you love it! It was a kit club item last June, and was very popular. So pretty and so many possibilities for edge cuts and so much more.

Blooming Roses - Large Die Of The Month Kit June 2018

Check the tutorial page to see how I made this card - I have the regular tutorial video, and a full, sped up video of the whole painting process.


The sentiment I used is from Gina K's Wreath Builder set - there are some really sweet sentiments in there!


I hope you're having a good week! 
Thanks for stopping by!


Ideas, Supplies, Machines, Paper & More


Wednesday, November 14, 2018

Splitcoast Tutorial: Wreath Stamping

It's my turn to share a tutorial over on Splitcoast, and this week I've compiled a few different strategies for Wreath Stamping! Here are few cards made using the Wreath Builder System from Gina K. Designs - I love this floral set, but she's added more to the collection for fall and holiday cards, as well as the beautiful Mandala Maker set! Any stamp set with smaller stamps will do - and think outside the box! Other shapes can be used for these cards as well. (Remember the strawberry wreath?)

 The card above was made using the Wreath Builder template - for the card below I just used the corner of my MISTI to align the panel, stamped 4 images in a ring, and then repositioned the stamps in between those impressions for the next round. A little more work, but with this method you can center a wreath on any size square!

The templates are designed to center wreaths on 3-3/4" or 4" squares, but they can be used for offset wreaths on larger or smaller panels... here's a card I made with a 5-1/2" square. Having a larger panel gives you more cropping options for an A2 front.


Click over to the tutorial where you'll find more samples, as well as some other fun techniques for creating wreaths with your stamp positioner!
Thanks for stopping by!


Ideas, Supplies, Machines, Paper & More

Saturday, December 03, 2011

Joy ornament

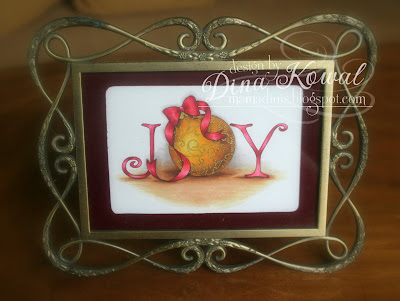
Although I had my Touch markers packed up, I had to pull them out the other night to color up this digital stamp from Gina K. Designs... I had a concept in my head that I wanted to see if I could duplicate, and I'm really pleased with how it turned out. The picture's not perfectly accurate (like the paper is actually white...) but I kept losing the true colors of the markers if I tried to fix the white.

I had shared the picture during the process with some Facebook friends, and they encouraged me to frame it.... so I cut a mat from some velvet paper cardstock using a Coluzzle template. It won't stay in this frame - I'll have to find another one... but this was the only 5x7" frame I could find (and it had my favorite wedding photo in it...)!

Speaking of traveling with markers, this is how they are packed now - previously I had some round containers in there, but found these ones that are taller and a perfect fit.

These are the markers I used on the image - I based my color choices on the current color challenge over at the Touch Twin Challenge Blog:

Thanks for checking on me! What a crazy week... Thursday is graduation and Saturday we leave for the States!!

Thanks for stopping by!