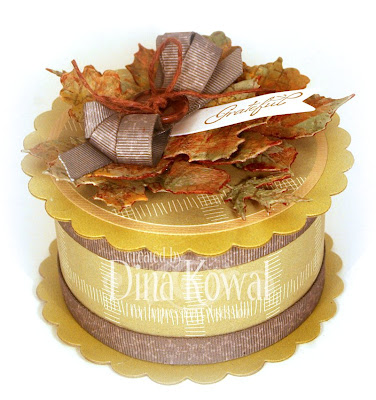
Tape Roll Box Tutorial - DT Thursday
Welcome to Impression Obsession's DT Thursday!
Last week I shared a gift box that I made out of an empty roll of tape. Today I'd like to share how I did that! Let's get started.
Tape Roll Box Tutorial
Supplies Needed:
- Empty tape roll (the one I used is 1-3/4" wide - your measurements may vary slightly)
- decorative paper to cover the outside and inside of the roll, cut just slightly narrow (mine are just under 1-3/4" wide x 11" long)
- 2 scalloped circles, cut from chipboard (I used Sizzix dies, and a cereal box - my circles are 3-7/8" wide)
- 4 scalloped circles, cut from coordinating cardstock (same size as the chipboard ones)
- 1 chipboard circle, same size as tape roll opening (mine is 3" wide)
- 1 cardstock circle, same size as tape roll opening
- 1 3" piece of satin ribbon (mine is 7/8" wide)
- PVA glue, hot glue gun, double stick tape
- trimming and embellishments for box top and sides
Instructions:
Cover the outside of the tape roll with one of the long paper strips, using PVA glue to adhere (you can use other adhesives if you prefer, but PVA glue holds paper well, and allows you to slide your paper if it's a little off at first placement). Center the paper as best as you can, so it isn't hanging over either edge of the roll.
Adhere the 3" satin ribbon to the inside back of your box, using double stick tape (the back is where your outside paper overlaps, creating a seam). This ribbon will be the hinge of your box, so about half of it needs to be inside the box as an anchor. The other half extends above the rim and will connect to the inside of the lid later.
Line the inside of the roll with the remaining strip of decorative paper.
Center and adhere the bottom of the covered tape roll to one of the scalloped circle sandwiches. Allow glue to dry.
Glue the remaining cardstock and chipboard circles together. Allow glue to dry.
Turn the box on its side so the ribbon is flat on your workspace. Position the scalloped box lid underneath the ribbon, then position the chipboard/cardstock circle over the ribbon, centering it on the lid. Glue the circle in place. You may want to lay a heavy book over the lid until the glue dries, to ensure that your layers dry flat.
**HINT** You may need to adjust the position of the ribbon so that the box closes well. (The first time I made a tape roll box, I didn't leave enough ribbon between the box and lid, so the lid couldn't open all the way.) Here's the distance that worked for me:
Embellish your box, and tuck a treat inside to share with a friend! Here's my completed project, in case you missed it last week...
Stamps and dies used:
Grateful
French Letter
Leaves die set
Flags
Thanks for visiting today! If YOU make a tape roll box, send me a link so I can see!!


Thanks so much for the tutorial, it's a great box not too difficult to make.
ReplyDeleteI love this idea! How creative of you to re-purpose a tape roll. I can't wait to try it out. Thank you so much for sharing!!
ReplyDeleteThank you for sharing the instructions. I love your box the first time I saw it. Thanks again!
ReplyDeleteBeautiful box!!! Lovely decorating of it, thanks for sharing!
ReplyDeleteThanks for sharing your tut Dina! Pinning this for when my tape roll is empty to try this myself. Beautifully done!
ReplyDeleteAwesome project, I love the ribbon and the leaves on the top! Thanks for showing up how to make it.
ReplyDeleteKatie B.
Great idea, Dina, and a wonderfully documented tutorial, right down to the hinge. Thank you so much for sharing your idea. And of course, the finished box is incredibly beautiful.
ReplyDeleteHow or what did you use to make the leaves stay stiff? This is beautiful.
ReplyDeleteHi Sandy! They're cut from cereal box chipboard, so they're thicker.
Delete