Kindred Stamps - Center Stage!
I've had this idea for a spotlighted stage rattling around in my head for a while - so excited to share it with you, using Kindred Stamps! Their character stamps are perfect for this type of masked scene.
Whatever defines an old soul, I have one. My Dad loved sharing his favorite old radio shows and movies with us, and I'm just really drawn to everything vintage - I'm even listening to WWII music while I type. When the Golden Age set came out, it immediately went on my 'need' list. Here's how I made this 'Center Stage' card!
Next I picked a 'vanishing point' - mine is on his little hat above - and marked it with a pencil. This should be somewhat centered horizontally but it can go anywhere above the floor line. If the point is lower, the floor will look more eye-level and the boards will have a wider spread.
For each floor board line, I lined up my ruler with the vanishing point and with a 1/2" mark on my grid mat, then drew the line from the horizontal line down.
Keep drawing lines until the floor is full - you'll need 1/2" (or whatever increment) lines to the left and right of the card panel to fill the space. I added a second line across so it looks like there is a baseboard behind him.
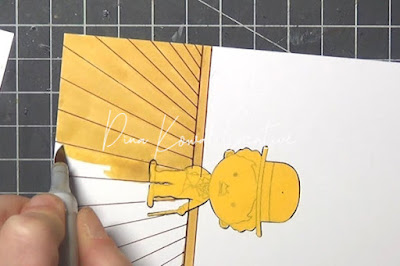
Color in the floor, following the grain of the wood.
Add some wood grain lines lightly, with a slightly lighter brown.
Color in the background with a light or bright color ( not sure why I chose green on this one, but I love it).
Die cut a long oval to use as a mask for the stage light.
I cut mine out of removable contact paper, but a paper mask is
fine. Place the mask so that the character’s feet are
in the center.
Mask off the panel at that baseboard line, then sponge or brush grey ink around the whole floor, and black around the edges.
Mark two points at the the top of the panel for your spotlight. They can be centered or off set, and 1/2" to 1-ish" apart. No need to measure.
Mask a straight line from the left mark to the outside of the oval.
Sponge or brush grey ink outside the mask, then add more black ink from the edge in.
Repeat on the other side.
Remove the masks and color in your image. Make sure to add a shadow - the light is directly above them, so the shadow will be small and vaguely shaped like a squished version of the character.
Add a sentiment and whatever other details are needed to complete the card!
Here's another card I made with a few little tweaks - on this one my vanishing point for the floor boards was about 1/2" above the top of the card panel, so you can see how it looks like we're looking down on the stage. The character is off-center, so I angled the spotlight too.
Around the spotlight I used a battery-powered eraser to remove some spots of ink, and also spattered in some pearl metallic ink for a little shimmer.
That's all I know! Thanks for visiting me today!


Love it!! Looking forward to giving it a try! Thanks so much for sharing!
ReplyDeleteGreat instructions and such a cute card
ReplyDeleteThanks for sharing your detailed instructions. I may try this for a theater friend’s next card!!
ReplyDeleteThanks so much for this
ReplyDeleteWow!!! This is excellent! You made it look so easy. I can't wait to try it!
ReplyDeleteOh, brilliant! I hope you feature this as an SCS tutorial some time?
ReplyDeleteI love this, I want to try this.
ReplyDelete