Showing posts with label A Jillian Vance Design. Show all posts

Friday, November 12, 2021

Fall/Winter Coffee Lovers Blog Hop - Super Sponsor!

It's time for the Coffee Lovers Blog Hop, and I'm honored to be a Super Sponsor again! Keep reading to find out how you can win a coffee-themed charm bracelets or one of two $10 gift certificates to my online store, and receive a special coupon code for 20% off your order!

In case you're new to my blog, I'll tell you a little about me...  I'm a working artist (see my commissioned pet portraits HERE), have 
my own line of stamps , and I'm the Artist in Residence at Splitcoaststampers, among other roles behind the scenes. I love to create, and I love sharing what I learn in the process. I have an online store where you'll find prints of my original artwork as well as notecards, handmade beads and jewelry and other items. I've been blogging here for 15 years!


We're just wrapping up a holiday event at Splitcoaststampers today, and one of today's challenges was to have a window on or in your card... I wanted to combine one of the challenges with my coffee card, so I searched through Evernote for images that had coffee and a window together - and that's why I used this fox stamp today! This image is part of a series from Katzelkraft, and they're all delightful.
I got this one from Topflight StampsThe sentiment is from AJVD - possibly retired. 
Dies: IO Slimline Sentiments Flag and Spellbinders Essential Label Etched Dies

Be sure to check out the Coffee Lovers Blog for instructions on how to participate for prizes - this is the bracelet that's up for grabs! I love these sweet charms, and that coffee bean bead is one of my handmade exclusives! 


Two more winners will win a $10 gift code to my online store, and you can use the code below for 20% off your $20+ order for the whole next week - now is a great time for shopping! Clicking the graphic below will automatically apply the coupon to your cart.

Thank you for visiting me today - enjoy the hop!

Thanks for stopping by!

When you shop through the affiliate links used here, the company sends a small commission my way at no cost to you as thanks for the referral.
It's a lovely way to partner with these companies that mean so much to our creative community. Everybody wins!



Ideas, Supplies, Machines, Paper & More

Wednesday, September 02, 2020

Splitcoast Tutorial: Triple Cube Card

This week's tutorial over on Splitcoast is a Triple Cube Card - these are so fun to make! Great project for using up scraps as well.I was itching to try out this new two-step Layered Acorns stencil set from A Colorful Life - I inked up the nut part right on some adhesive patterned paper, and then used Nuvo Glimmer Paste for their little caps. 
I had a background I wasn't happy with from a tutorial experiment, so that got cut into squares for the inside of the top cube... the little sentiment block sits on the front corner of the cube base, a little hidden surprise when you open the card to set it up.
The best part is that the card folds flat for mailing! It's 4" x 6" when flattened down, so here's how it fits in an invitation envelope. A6, I think?
Here's a closer look at the sparkle on those acorn caps. Love it.And here you can see how that sentiment panel sits - and that sentiment comes from A Jillian Vance Design's adorable Hello Fall set.
That's all I know! Working double time today - cheers!

Thanks for stopping by!


Ideas, Supplies, Machines, Paper & More

Friday, May 22, 2020

2020 Spring Summer Coffee Lovers SUPER SPONSOR!

If you love a hot beverage, you'll love the Coffee Lovers Blog Hop - you can find all the information on links, prizes and how to play along by clicking HERE! Warm up your coffee, tea, and cocoa stamps and add a card to the hop, or just hop along for the inspiration and comment for chances to win!


I'm happy to be sponsoring the hop once again - two lucky participants will receive a $10 gift code to my Etsy store and a commenter will win a coffee-themed die set from Spellbinders. Also, please enjoy a discount when you shop in my store, using the code below! Clicking the graphic should add the code to your cart automatically once your total is $20 or more, and that coupon is good till the end of the month.


To continue the love on Etsy, I wanted to highlight a few images from Di's Digi Stamps - Di has some adooooorable digital images, and she's just opened up a store over on Etsy where you can find all kinds of delightful images like these for instant download! I picked a few of the tea-themed images, but there are many more to choose from! 


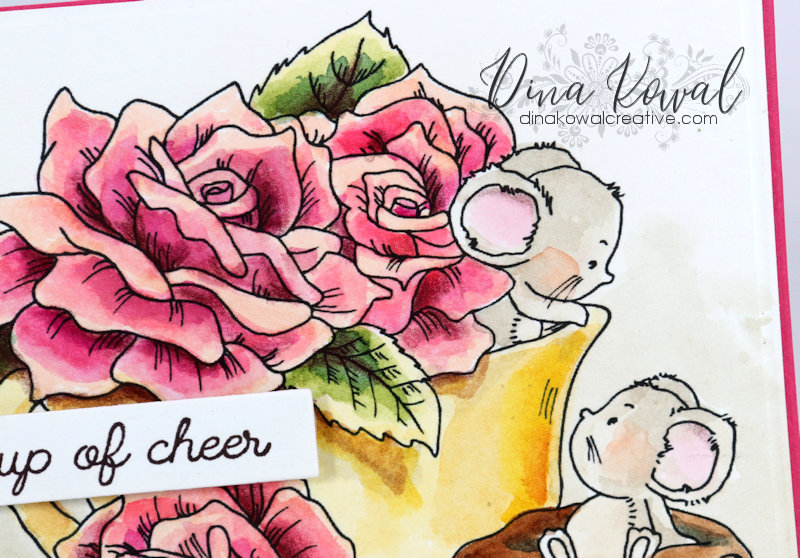
I printed these images onto watercolor paper and worked in layers to color each little scene. On the roses and cup here I used Karin Markers for even base layers. My favorite handy palette is full of QoR watercolors, so I used those to add shading and details.


I had some perfect sentiments for these cards from A Jillian Vance Design - the particular set I used is retired but all these sentiments are included in a newer coffee/tea sentiment set called Hug in a Mug - if you're looking for some tidy one-liners for your cards, be sure to check that set out!


Another sweet tea theme, and those macarons - yum!


One more just for fun - this one is called Strawberry Tea, and those berries were so fun to color up! Strawberries are one of my favorite summer treats. I did use a little bit of colored pencil on these for darker shading in a few areas.


I used a stencil for the background on this card... that one is not released yet, but I'll share a secret - A Colorful Life Designs will be coming out with a few coffee themed stencils on June 1st! The one I used here has some drips and a coffee ring - you'll love them. Enjoy a 10% discount over there with my code DinaFan10 any time!


That's all I know today - enjoy the hop, and thank you for visiting me - I hope you'll pop over to Etsy to check out my store as well as Di's Digis! Cheers!
Thanks for stopping by!


Ideas, Supplies, Machines, Paper & More

Wednesday, October 16, 2019

Splitcoast Tutorial: Lollipop Covers

This week's tutorial over on Splitcoast is a quick and easy way to turn a lollipop into a holiday treat! Pop over to the tutorial page to see how I used dies to make these fun little covers. Cute, huh?

Thanks for stopping by!


Ideas, Supplies, Machines, Paper & More

Wednesday, October 02, 2019

Splitcoast tutorial: Stained Glass Panels

This week's tutorial over on Splitcoast is called Stained Glass Panels - it's a fun way to add a stained glass effect to die cut openings!


 This card is a small victory for me because I finally took the time to figure out how to design and cut a shaped card out with my Scan 'n Cut! I cut 3 of the pumpkin fronts, and then flipped and overlapped 2 pumpkins to make a folding base. I used an oval cut to mask off the shading lines, then brushed orange ink along each ridge with a little extra brown ink at the bottom. 


I could have cut the faces from the cards, but I really wanted to use this Jack O. Lantern die set from A Jillian Vance Design - I love the face and stitching detail, but I especially love that the die is all one piece, and it's a great size for card fronts or goodie bags. So cute! I mixed yellow Brusho with my gel medium in the die cut openings - I couldn't find any glossy medium, so I just used matte and that seemed to work ok.


Here's the card with a battery tea light inside - so fun! Do you have a die that would work with this technique?

Hope you're having a good week - I'm working on Christmas crafts when I have the time, and started on another portrait over the weekend - a pug! You can follow my progress on Instagram. Cheers!
Thanks for stopping by!


Ideas, Supplies, Machines, Paper & More

Wednesday, August 07, 2019

Splitcoast Tutorial: Acrylic Stencil Deboss

It's my turn to share a tutorial over on Splitcoast! It has been my pleasure over the last few years to work with Clearsnap to present tutorials using their products, and with the announcement that they will be closing.... this is our last collaboration. I'm truly so sad to see them go.

Supplies used:
ColorBox® Art Screens Trios - Disco
Spellbinders Coffee Brewing die set
A Jillian Vance Design - Perk Up clear set
Simon Says Stamp - Small Folded Banners die set
Impression Obsession Ornament Flourish die set

This week's technique is called Acrylic Stencil Deboss, and I hope you'll visit the tutorial page to see how it's done! The technique begins with a stencil impression, which you can achieve using a die cutting machine - you'll need to have an embossing pad on the bottom, then cardstock, and your stencil on the top. The Crossover II machine I have works great for this technique, since I can set the pressure to accommodate the extra thickness - those are on sale this month, so if you've been thinking about a new machine, now is a great time to get one at 30% off!  


Here's a second sample -I used the same stencil, but used the back side of the cardstock for a reverse impression. This truck die set from Spellbinders is one of my favorites!

Supplies used:
ColorBox® Art Screens Trios - Disco
Spellbinders Truckin' Through the Seasons die set
Spellbinders So Many Sentiments Etched die set
Maker's Movement Pierced Circles Nested Essential Die Set
Impression Obsession Treat the World cling stamp

I hope you're having a great week! I'm overwhelmed, not gonna lie! School starts next week, the State Fair starts Thursday, I have stamp art deadlines looming, commissions in progress, and a mountain of products to review, and I just saw that new Fall dies are in the chute... all good things, just all at once.... acckkk! How do you balance life when you're overwhelmed?

Thanks for stopping by!


Ideas, Supplies, Machines, Paper & More

Monday, June 26, 2017

Stained Glass with Background Dies

Thanks to everyone who's visited my blog for the Coffee Lovers Hop! I have some more projects to share today for the hop today using the amazing Grandpa's Glass: Cup of  Love  Die from A Jillian Vance Design. 


I used a favorite technique to deboss the image of the die into watercolor paper without actually cutting through the paper. Here's the sandwich I used for the Big Shot - I have the platform open on the bottom, a cutting plate, the silicone embossing pad, paper, die face down, and another cutting plate on top.


I'm actually using the back side of the paper for this card - you can see how the cutting lines of the die have created a raised design on the reverse.


I rub a white crayon over the raised outlines, and that creates a resist for my watercoloring. I used QoR watercolor paints for the open areas and Zig markers to add shading.


Here's a closer look!  This was so much fun to create. The sentiment set I used is called Perk Up, and all the sentiments are designed to fit inside the open space here. So clever!


For my second card, I just used the debossed image as the focal point for my card - no color added.


For an accent, I just added some scored lines onto my card base at a diagonal. (Truthfully, I went off the rails a little when I was scoring the edge of the card, so this was my attempt to distract from that. But it works. Shhh.)


That's all I know! I have a busy week here with in-laws here to visit, and an art show this coming weekend - I finished up a painting for the show on Friday, and I'll share it later in the week. Have a great one! Thanks for stopping by!