Showing posts with label Our Daily Bread Designs. Show all posts

Wednesday, January 10, 2018

Splitcoast Tutorial: Stamped Die Cuts

It's my turn to share a tutorial over on Splitcoast. This week I've compiled several techniques for stamping on coordinating die cuts. These are the cards I made for the video...


The sentiment here was positioned using the die cut opening as a template, since the die is solid... that stamp and die set are from Simon Says Stamp, and I'm pretty sure they're both retired. That kitty though - over the holidays I collected most of the dies from that series by Sizzix - they're so cute, and make really fun gift tags. They were all on sale for about $3, which is an amazing price for a steel rule die. The kitty is here, and you can see the others in the series here.


This was a quick card made with a matching stamp and die set from Impression Obsession by Pink Ink - I share 2 ways to line up the die with the image for this sample.
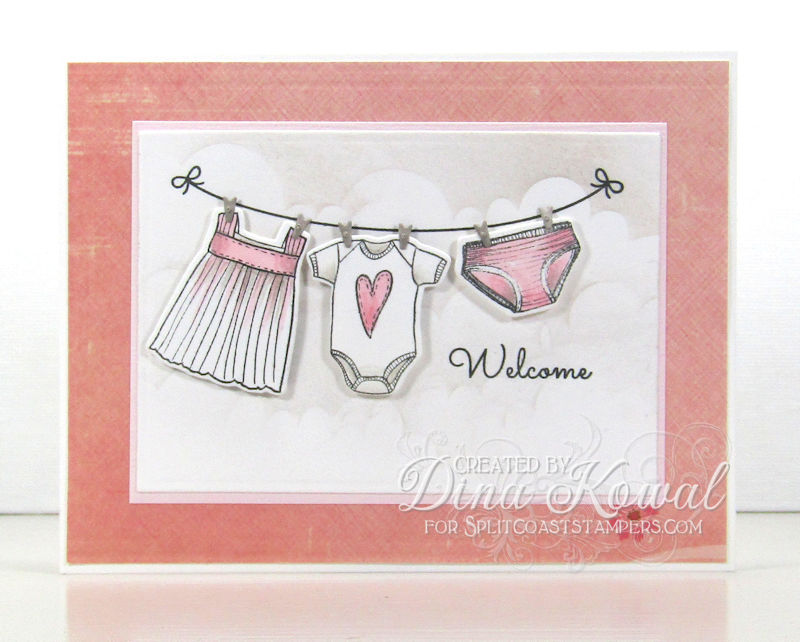


This is another coordinating stamp and die set from Impression Obsession - this set of dies is threaded together, so I share a way for lining up multiple images at once. For another method, check out Lydia's blog post here. 


This tag die is also retired (Our Daily Bread Designs) but it's one in my collection that uses a system of positioning by registration marks with a template, so I wanted to include that method as well. The stamp I used is a sneak peek of one of Lindsay Ostrom's spring designs, and the kite die is here. 

That's all I know! :) 

Thanks for stopping by!

Wednesday, August 02, 2017

Splitcoast Tutorial: Step Pop-Up Card

This week's tutorial over on Splitcoast is an elegant Step Pop-Up Card. Here's mine, which fits a couple of our Dare To Get Dirty challenges this week! 


This card is designed to stand on its own, and it's got a pop-up element as well as a little depth for a scene on the inside cover. My background inside the card was done using Clearsnap dye inks spread on a craft sheet, misted and printed. The girls were stamped in the same dye ink, and colored with Copic markers.


I don't normally mix stamps from different companies, but I do relax that rule for challenges like these. The girls are from one of Phyllis Harris's images at Unity Stamp Co, the beach background is from Bad Axe Trading Co. (no longer in business), and the quote stamp is one of my designs that's still available from Our Daily Bread designs. The arch die is from Spellbinders and the fence is from Impression Obsession.


Dare To Get Dirty is a week of fun, challenges, and prizes for our Fan Club members at Splitcoaststampers! So much of our site content is free, but there are some special 'perks' and members-only content for paid members. Dare To Get Dirty is our annual "thank you!" to the members of our Fan Club. This year we are throwing 35 challenges at them in the course of a week! It's a lot of fun behind the scenes, hosting the challenges and encouraging these sweet ladies as they jump in with us and see what it's like to get a little Dirty! Thanks for stopping by!

Friday, April 29, 2016

Mix-Ability challenge: Loose Florals

Today's Mix-Ability challenge was definitely a challenge for me - Lydia wants us to create loose watercolor flowers. I tend to work from photos and work into details, so 'loose' is not really my forte... but... I tried. :)


I started with a wash over my whole panel, then dotted in purple where I wanted the lilac to generally be, and let that bleed into the water. (I use QoR watercolors - love them! The paper I'm using here is a Fabriano Medioevalis watercolor card.) As it dried, I continued to dot in paint, a little darker each time, to add depth. I filled in with a light background, and let the panel dry completely.


Over the dried lilac base, I created some negative flowers by painting an outline and then pulling the paint outward instead of in, and also used a Distress marker to sketch a few flower outlines. The leaf and stem are also painted in the negative.


I wanted to add some texture to the card with a technique I've done on canvas, and it didn't work as I had planned, but as usual I like it better this way. I used a palette knife to spread some thin layers of matte gel medium onto the card, and pressed an embossing folder into the medium while it was still wet. It looked really cool before it dried... but when it dried it disappeared! The texture was still there, so I lightly rubbed white acrylic paint over the texture with my finger and I like that look - it breaks up the color in the painting a little, and gives it a worn, vintage look.


My second card did start out as a loose painting... but as I added layers, it got less loose. :)


Here's how it turned out - there are several layers of detail and shading - I still like it, just not sure how it will fare with the challenge police! I used the same technique for adding texture, so my mediums here are watercolor, ink, and acrylic. The verse stamp is one of my older ones from Our Daily Bread designs - not sure if this one is still available anymore.


Hope you'll give this a try! I might do some more just for practice... I definitely need to loosen up!


Thanks for stopping by!

Saturday, November 02, 2013

Mix-Ability - Adhesive & Glitter

This week we're welcoming the amazing Anna Wight to our Mix-Ability hostess team! She's brought a fun and sparkly challenge to the table - use a sticky medium to adhere glitter to your project.


I made my project to fit Lydia's HYCCT challenge too - so my card is black and white with a pop of purple. This is a set I designed for Our Daily Bread designs - I stamped it on mixed media paper, and masked off the edges, then dropped in some water and ink to color the background.


When that was dry, I used a Tim Holtz stencil to sponge in some rays, and then.... I used the same stencil to apply rays of PVA glue to the scene (using an old library card as a scraper) and create a sticky surface for my glitter. I'll definitely plan on a tutorial later to share this technique - it is sooooo fun, and has some fun possibilities as well.


I offset the fold of my card so that I could use the sentiment as a kind of latch.


Love this sentiment - DARE was my 'one little word' this year, and it's pushed me in our ministry and also in my creative life. So grateful.

Wow, November already?!?
Thanks for stopping by!

Wednesday, September 11, 2013

Inchie Arts - Inspired by NY Street Art

Wanted to use a flag image to honor Patriots' Day... I had already colored the flag (Old Flag Background, one of my background stamps at Our Daily Bread designs) on a white ATC from Inchie Arts using  Touch Twin Markers then sat down to watch spray painting videos on Youtube with my kids... since I had just colored the flag, this particular video of a New York street artist inspired me when I went back to my stamping desk, and I couldn't help seeing the flag as part of a more detailed scene.


I added some white acrylic paint splatters to the ATC, and the doubled-up Town Scene diecut from Impression Obsession... I wasn't brave enough to actually put spray paint to this piece since it was already done, but I'm working up my nerve!


I used a glaze pen to mask the stars before I colored - that works really well with water-based mediums but not as well with alcohol markers... I still was able to remove most of the marker with the blender pen, so it wasn't a total fail. Definitely a better effect with inks and watercolors though!

 
I sponged along the left side with grey Versafine ink to help the shadow effect on that side. The image was originally stamped with Memento London Fog ink.


Click here for more Inchie Arts products!
Thanks for stopping by!


Friday, July 12, 2013

Kind Hearts

This week's Mix-Ability challenge is to use pretty designer napkins or tissue with decoupage medium to create beautiful projects... I don't have any pretty napkins or tissue paper, so I just used white tissue paper to add texture to my card!


This panel was a leftover piece from a label I cut for another card - it started off with dye ink and some stenciled flowers but it went through so many layers following that, I'm not sure what all is where now! Sometimes mixed media works that way...! Forgive me...?


I cut a piece of white tissue paper to the size of my panel, crumpled and smoothed and adhered it with Crystal Lacquer. After it dried, it underwent several layers of stamping (Poppies and Vintage Postcard from Sweet 'n Sassy Stamps) and acrylic paint.


A hint for this type of technique with the tissue paper: you can very lightly smooth thick acrylic paint over the wrinkles with your finger to highlight them.


This sentiment from Our Daily Bread designs fit perfectly in my frame opening.  Hope you'll check out the new challenge details and join us!

Thanks for stopping by!

Friday, March 15, 2013

Splatter-ific!

Tiffany's challenge for this week's Mix-Ability challenge is to water down a coloring medium and splatter it! This was a lot of fun, and messy too! I ended up with spots all over the desk, up my arm, and I think I felt something in my hair too...! Here's my card...


My background and the cross were done using Shinhan Premium Watercolors (Marine Blue, Peacock Blue, and Crimson Lake). I used some of my stamps from Our Daily Bread designs - Grunge Cross Single (coordinating die HERE) and a verse from the Cross of Christ set.


I watered down and splattered paint from the upper left corner, then squooshed some Versamark ink through a Crafter's Workshop stencil and embossed that image with white embossing powder. Afterwards, I sponged some chalk ink over the embossing, and stamped the text stamp several times.


I love this text stamp, and this stanza of the hymn "Beneath the Cross of Jesus":

I take, O cross, thy shadow for my abiding place;
I ask no other sunshine than the sunshine of His face;
Content to let the world go by, to know no gain or loss,
My sinful self my only shame, my glory all the cross.

To color the cross image, I actually watercolored right on the stamp, letting the colors blend, and spritzed with water before stamping to watercolor paper. I held the stamp to the paper for about 10 seconds before lifting it up, so the colors had a chance to bleed and soak in a little.


Check the Mix-Ability Challenge Forum for all the challenge details!
Thanks for stopping by!

Saturday, November 10, 2012

Daily Window Bag Contest!!


Have you been looking for a portable way to display your artwork, scrapbooking, or photos? 

Are you ready for a chance to win a Daily Window Bag like this?
Maybe even some spending cash?!

 Daily Window Bags has generously organized a contest where you'll create a sample card that would fit in their customizable bags. It's so easy to enter, and the prizes are amazing:
The 1st place winner will receive:
a Daily Window Bag of their choice and $100 cash.


Seven other winners will receive:
a Daily Window Bag of their choice.

Here's what you need to do: Create a card with a seasonal theme! Any season will do. 

1. Make your card base 5-3/8" x 7-7/8". This will fit perfectly in your new Daily Window Bag if you win!!

2. Please use rubber stamps to personalize your entry, and keep in mind that all entries will be judged based on uniqueness and creativity. We want to see cards that express who you are, while following the theme of the challenge.

3. Email your entry to ontrack@dailywindow.com by November 30th, 11:59 EST. Please photgraph your entry against a solid background (black is preferred), and make sure your photos have a minimum resolution of 300 dpi.

4. Participants agree to allow their entries to be used in advertising and promotional materials, on the DWB blog and other websites. Some entries may be requested as physical samples for trade shows and conventions. Artists will always be credited for their work.

 Here's the newest piece I created for my bag - it was done with acrylic paints and stamps from Sheena Douglass, Jim Stephan, and Impression Obsession.


You have plenty of time to come up with the perfect entry - and if you win, you'll be able to tuck it right into the pocket of your new bag! Come play along!

Thanks for stopping by!