New Spellbinders release – Big, Great, Wonderful World!
I finally got to sit down and play with some gorgeous new Spellbinders dies yesterday - these are from Sharyn Sowell's newest collection, called Big, Great, Wonderful World. I am such a big fan of her heartfelt designs, and these new ones are just so sweet!
I made a couple of acetate tent cards, figuring out my own measurements as I went along. Both cards were designed the same way, with a pretty background panel on the inside of the card (great way to use up the stash!!) and a sturdy acetate panel in the front. My coloring on the die cuts was minimal, and actually even more subtle in person - I just used a W1 warm grey Copic marker to define some lines and shadows.
I started with a half sheet of cardstock for the base, 5-1/2" x 8-1/2", and scored along the long side at 1/2", 1-1/2", 2-1/2", and 6-3/4". I used a large oval die to cut the end into a curve - a decorative border die would work here too. **Notice here how I just have one edge on the top of the cardstock so that section of the die is the only part that will cut.
The inside panel of the card is just slightly smaller than the A2 size panel - just 1/8" trimmed off the width and height.
I added some strong double sided tape at the top of the flap, and on the 1/2" flap at the bottom of the card.
I pulled off the liner of the tape at the top of the card first, lined up the acetate panel with the fold, and closed the card to adhere. I did the same at the bottom, tucking the acetate under the 1/2" flap. The sheets I'm using here are from MyBinding and I use the 20mil weight. These are the same sheets I use for storing my unmounted stamps - they're very sturdy.
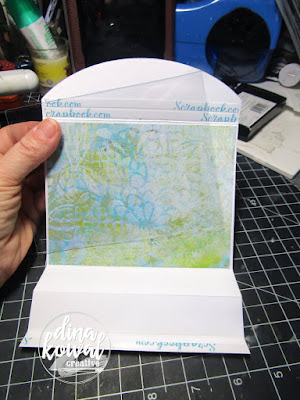
Here's the basic card structure! Pretty simple, and a great base for larger dies or frame dies.
To adhere the die cuts to the front of the card, I used Artist-tac Dry Adhesive Sheets, which I reviewed here a few days ago - it was perfect for all the fine details of this intricate die, it stuck perfectly to the acetate, and no mess!
Here's a peek inside the cards - the background above was created using strips of scrap paper - the one below is a gel print made with acrylic paint and stencils from A Colorful Life Designs. These cards will fold flat for mailing, too, though I'm not sure if the extra thickness at the bottom will require extra postage.
Stamps I used: B13738 Sure Miss You and B13497 Your Story from Impression Obsession
Dies I used: Dance For Joy, Join the Parade, Grand Ovals Nestabilities (retired)
In other creative news... I finished my final portrait of the year yesterday! Thanks to everyone for your support of that adventure - it has really been a joy.
Thanks for visiting me today!


WHAT A WONDERFUL CARD, Dina! I LOVE those silhouette dies & the way you used them is PERFECT! I LOVE the fold you've used! It really shows off those sweet dies! ;)
ReplyDeleteAwesome post.
ReplyDeleteSo cute! I love them. What size of the plastic sheet did you cut for them. I searched but could not find where you gave it in the instructions. Brenda West
ReplyDeletehi Brenda! The plastic is cut to 4-1/4" (or maybe just slightly smaller) x 5-1/2".
Delete