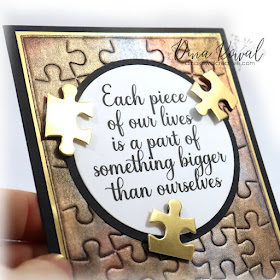
This week's tutorial over on Splitcoast uses PanPastels to create a faux metal finish - you can find the tutorial HERE!
 If you're unfamiliar with PanPastels, they are a compressed pastel medium with tons of pigment and very little binder. A little bit goes a long way with the colored pans, and the same is true with the metallics! The pans are available individually or at a little discount in sets of 3 or 6 - I've got the set of 6 here grouped with some of the pearl and blending mediums.
 If you're unfamiliar with PanPastels, they are a compressed pastel medium with tons of pigment and very little binder. A little bit goes a long way with the colored pans, and the same is true with the metallics! The pans are available individually or at a little discount in sets of 3 or 6 - I've got the set of 6 here grouped with some of the pearl and blending mediums.
 Instead of an embossing folder I used a background die to make an impression in my black cardstock (this is done by running the die through the cutting machine with a silicone pad instead of a hard plate):
 |
| DIE448-YY Puzzle Background |
The impressed lines remained black when I applied the PanPastels, which gives a neat antiqued effect. The tutorial uses an embossing folder, which looks nice too!
 This sentiment was a perfect "fit" - it is a new one in the Fall release. You might be able to see in these closer pictures how the die cuts all but the corners of the pieces so you can cut a full panel and keep it together as a background if you like - but the pieces are also very easily separated with a craft knife so you can cut a panel up into a puzzle. I actually cut out the center of the gold layering panel, and used that center piece to cut a few edge pieces for my accents. No sense in all that good mirror cardstock being covered up!
Be sure to check out the Splitcoast gallery for other examples of this technique... I'm joining some other IO designers in showing off dies today, so you can find their links and inspiration on the I.O. blog!
Speaking of IO, we are excited to reveal a new line of stamps designed just for slimline cards this week - come back tomorrow and Friday for lots of ideas using the new Slim Scenes stamps!


BEAUTIFUL WORK, Dina! Like I said yesterday over on SCS, I have been eye-balling that Puzzle Die for some time! AND LOVE the way you used it! It looks FABULOUS & the sentiment is PERFECT with it too! I'll be WATCHING for those Slim Line Stamps! SOUNDS GREAT!!! HAVE A BEAUTIFUL DAY!!!! ;)<3
ReplyDeleteLove everything about it!
ReplyDelete