Friday, March 30, 2018

Flash sale!

To celebrate Easter weekend, please enjoy a 30% discount on all my art prints! 


Thanks for stopping by!

Impression Obsession Spring Die Hop - Day 2

Welcome to the Impression Obsession Team Spring Die hop! We have some beautiful new dies to share with you, and prizes too. Keep reading to find out how you could win a $25 gift certificate and get a few dies of your own!


A few of the girls shared this die set yesterday - it's really a lot of fun! The inside window and the outside shape are actually separate dies, so I was able to cut a card base to match the shape very easily - I just extended the top curves of the frame over the fold of my card when I cut.


I cut the bunny out of my favorite luxurious Fabriano Mediovalis stationery and watercolored with my favorite QoR paints. I hand cut a little piece of wool felt for the tail.


Stamps and dies I used:  Bunny Frame die

Comment once per blog per day for a chance to win an Impression Obsession Gift Certificate!  The more blogs you visit … the better chance you will have to win one of three $25 Gift Certificates.  Be sure to check out these other designers' blogs for inspiration, and the Impression Obsession blog for all the details!


the Impression Obsession blog
Daniela @ For the First Time

Dina @ Dina Kowal Creative
Giovana @ Believe
Ilina @ Creativity Within
Jeanne @ Inky Paws
Jenny @ One Krafty Kat 
Karen @ Paper Lilies and Ink 
Kelli @ Stamping with a Dream 
Kittie @ Kittie Kraft
Laura @ Laura's Stamp Art Journal

Vicki @ Summerthyme Studio

Thanks for visiting me today!
Thanks for stopping by!

Thursday, March 29, 2018

Impression Obsession Spring Die Hop - Day 1

Welcome to the Impression Obsession Team Spring Die hop! We have some beautiful new dies to share with you, and prizes too. Keep reading to find out how you could win a $25 gift certificate and get a few dies of your own!


I shared a peek at this card yesterday - the background was done with a Magic Stamp, which I got to review for Splitcoast - it's a foam block that you can heat and press into any textured surface, and then stamp with that texture in reverse! For my background I pressed it into the French Word Background stamp. I brayered acrylic paint onto the block, and then pressed it onto my Gelli Plate, showing the script in the negative to create one of the layers on my background panel.


 I love this new unicorn die - I left it uncolored and added a few clouds as well. The sentiment is from my line, and it's linked below!


Stamps and dies I used:  Amazing, French Word BackgroundRainbow Unicorn die

Comment once per blog per day for a chance to win an Impression Obsession Gift Certificate!  The more blogs you visit … the better chance you will have to win one of three $25 Gift Certificates.  Be sure to check out these other designers' blogs for inspiration, and the Impression Obsession blog for all the details!


the Impression Obsession blog
Daniela @ For the First Time

Dina @ Dina Kowal Creative
Giovana @ Believe
Ilina @ Creativity Within
Jeanne @ Inky Paws
Jenny @ One Krafty Kat 
Karen @ Paper Lilies and Ink 
Kelli @ Stamping with a Dream 
Kittie @ Kittie Kraft
Laura @ Laura's Stamp Art Journal

Vicki @ Summerthyme Studio

Thanks for visiting me today! Hop along to Giovana's blog next!
Thanks for stopping by!

Wednesday, March 28, 2018

Splitcoast Product Review: Clearsnap Magic Stamp

This week the Splitcoaststampers Product Focus team is playing with Magic Stamps, courtesy of our friends at Clearsnap!


Magic Stamps are made of moldable foam, which will take the texture of anything pressed into it when heated. I actually started my first project by pressing my block into a piece of crumpled newsprint (I think it was actually from a Clearsnap package!), and this background is my favorite. 


With several layers of stamping with misted Distress Oxide ink, the texture in the stamp gave a beautiful marbled look.


I tried a variety of surfaces, and used them all - other favorites were dies, stamps, and lace.


My main project using the Magic Stamps was this stack of tags - I always tuck a tag in with my Etsy orders and I have been out for a while, so this was a perfect opportunity to restock. For some of the layers, I coated my Gelli Plate with acrylic paint, and then picked up paint with the block to stamp on the tags directly.


Another technique with the Gelli Plate is to brayer the stamp with acrylic paint and stamp it onto the block. 


You can create several layers this way, letting them dry in between, and pull some really interesting prints afterwards! The background on my unicorn card was done using that technique - I will share that full card another day!


That scripty background was created by pressing the Magic Stamp into a French script stamp - that's one of my favorite textures for a background, and it's pretty neat in the negative here.


You can see in the photo the strength of the impression into the block - it doesn't make a very deep impression, but it's enough for stamping firmly on a flat surface. Here's another example done by pressing the block into several border dies - I'll share this card another day as well.


I hope you'll take a look over at the team's reviews and amazing sample gallery! If you'd like to try out Magic Blocks, you can find them HERE!


Thanks for stopping by!

Splitcoast Tutorial: Bunny Bag-a-lope

Today's tutorial over on Splitcoast is a Bunny Bag-a-lope! Such a cute little project.


The base of the project is a mini treat bag made from an A2 envelope - the base when it's completed is 2" x 2-1/4", and it's about 3-1/2" - 4" tall. The bunny is done with various die cuts - the tutorial sample is done with all hearts and ovals, but I have some animal die sets from Paper Smooches and Lawn Fawn so I used a few of those pieces as well. The sentiment is an old one by My Heart Stamps For You.


Super cute, timely project - hope you'll put one together! I need to pick up something to tuck inside, and I think this one will go in the mailbox for our carrier!

Thanks for stopping by!

Thursday, March 22, 2018

DT Thursday - Stamping with Watercolor Powders

Hi, and welcome to Impression Obsession's Design Thursday! It's my turn to host and I have a technique video for you - I shared this technique over on Splitcoast yesterday, so if you missed it you can check out that tutorial here.


The technique is really great for stamps with large solid areas like this one, and a stamp with a mostly black index like this might be a little intimidating... am I right?


Here's a video showing how I created this card using a stamp positioner, a little water, and some watercolor powders. I have another post HERE featuring this same stamp with another idea for inking.


It's a fun technique that I hope you'll try! I used a little diluted ink and a waterbrush to shade the hills and give the crosses some shadows - you can see that more clearly below.


Stamps I used: Cross Sunrise and People in Need
Other products: MISTI stamp positioner, Brusho crystal colours, Nuance powdered dye, Zig Clean Color markers

Thanks for visiting me today!
Thanks for stopping by!

Wednesday, March 21, 2018

Splitcoast Tutorial: Stamping with Watercolor Powders

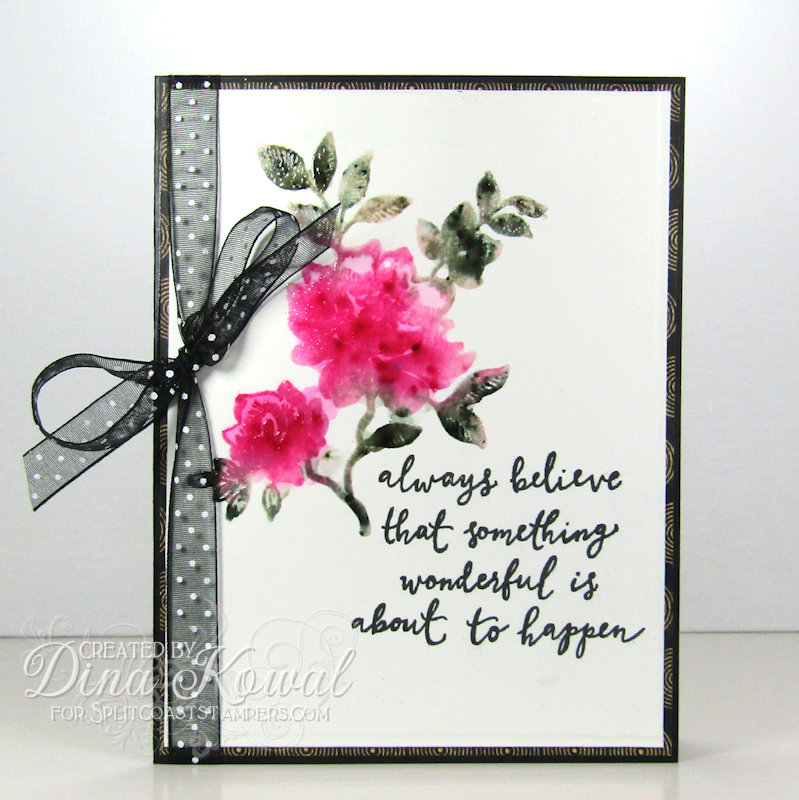
It's my turn to share a tutorial over on Splitcoast, and today I'm sharing my technique for Stamping with Watercolor Powders!


For the technique you'll need a stamp positioner like the MISTI, water in a mister bottle, and some watercolor powders (I used Brusho, Bister, and Nuance powders in the video) - you can click over to the tutorial to see how it's done!


In the video you'll see my repackaged Brusho powders - the Brusho pots are a little difficult to work with, and an open pot of powder on my desk is a dangerous thing! The bottles I am using are 15 ml plastic dropper bottles similar to these ones. I also purchased some small funnels to ease the transfer of the powder. This size accommodates a full pot of Brusho perfectly.


For each bottle, I made a small label so I'd know the exact color of the product inside, and that's taped to the side of the bottle.


Here's the second card I made for the video, using an outline image (these stamps are from Reverse Confetti - for a chance to win a gift certificate from them, click HERE!).


After the watercolor was dry, I restamped the image with Versamark ink and embossed it with clear powder - I like how that keeps the watercolor look but gives the image a little dimension.


I love this technique and I hope you'll give it a try!
Thanks for stopping by!

Tuesday, March 20, 2018

My Sweet Petunia and Reverse Confetti!

I'm hanging out with the My Sweet Petunia team today - hope you'll join us for a special hop with Reverse Confetti! Prizes are involved... so keep reading for all the details! If you just happened on the blog hop because you're a regular reader of my blog, and you'd like to view the entire hop, keep reading and you'll find a full list of participants at the end of my post. If you're already hopping and you arrived here from Amy Rohl's blog you're doing just fine.


I am slightly obsessed with the idea of rotating panels in the MISTI to create symmetrical designs - I used the strawberry and seeds from the Berry Sweet set this way, positioning the berry just once, and turning the panel for each impression with a flat side along the bottom. 


I embossed the stamped images with clear powder and loosely watercolored and splattered the panel for texture.


I used the same technique with my second card - these small stamp are also part of the Berry Sweet set. I positioned them a few at a time, inking and rotating with each impression. It took several rounds to fill in the whole panel as you see it. 


I did a tiny bit of light shading on the leaves with a colored pencil. I love this cheery design, and I'm looking at all my small stamps in a new way!


For my last card, I used a set called Something Wonderful... I stamped the roses in kraft ink on a kraft cardstock panel, then used colored pencils to layer color over the solid areas. The sentiment is double stamped with a kraft shadow and black embossing. I added a little texture to the background with stenciled ink and PanPastels.


Both companies are sharing prizes for this hop - two lucky commenters from the hop will win one of two prizes: a $60 shopping spree at www.mysweetpetunia.com and a $60 shopping spree at www.Reverseconfetti.com!


 Be sure to comment by the end of the day on Sunday, March 25th - winners will be announced Monday on the Reverse Confetti and My Sweet Petunia blogs.  Thanks for visiting me today! You're off to Heather Hoffman's blog next!

Thanks for stopping by!


Dina Kowal <<<<<<<<<<<<<<<<< you're here!

Whimsy gift certificate winner!

Congratulations to Marjorie - you're the winner of the $15 gift certificate! I will pass your information on to my friends at Whimsy Stamps, and you'll be hearing from them very soon!

Marjorie DUMONTIER3/17/2018 8:07 PMWhat a great kit !! We never have enough papers in the card kits so I think it’s very clever to offer such a kit ! I also love your fairies and the little spring fairy is my favourite stamp of this release.

Thanks to all who commented!
Thanks for stopping by!

Saturday, March 17, 2018

Paper Door Part 2!

Just wanted to share a couple more projects I made using the Paper Door kit I shared about yesterday! Keep reading for another chance to win a $15 gift certificate from Whimsy Stamps.


I shared this stamp image yesterday, but for this card I used black ink for the outline and colored it in using colored pencils for a completely different look. I used the stencil and gold ink from the kit to add some splashy fireworks to the background, and splattered some of the same ink around the wand for even more sparkle and kick.

This card was so much fun to make - this is done with the individual smaller stamp elements from the set. I started off with the images in green - I positioned the stamp, inked and stamped, then rotated the panel 90 degrees and stamped again, and repeated that around the panel... since the panel is a square, it stamped in the same position on each side. I repositioned the stamp between my first two impressions, and did another round of stamping to complete the ring. I followed the same process for the star image, and then added the little 'poofs' by hand. So fun! I'll have a couple more ideas with this technique coming up next week. Here's a closer look!


Like I mentioned yesterday, I have one $15 gift certificate to give away! For an extra chance to win, please visit the Paper Door info page, then come back and tell me about your favorite feature of these new kits! Make sure I have a way to contact you as well! I will draw and post a winner Monday evening (March 19) at 8:00 Central time!


Thanks for visiting me today!

Thanks for stopping by!