Thursday, November 29, 2012

Friends of Sweet 'n Sassy Blog Hop

Happy Birthday, Sweet 'n Sassy Stamps! A group of "Friends of SNSS" are joining together to celebrate this milestone birthday... I bought my first SNSS sets almost 2 years ago after the January 2011 release (there was a particular bird image I fell in love with), and was a guest designer a few months later in March. I found a kindred spirit in Korin, and a few months later, she asked if I'd consider expanding my dkdesigns stamp line as a designer for her company. It's been a blessing to work alongside her, and even to meet her in person when we were in the States this year... it's fun to share both our sweet and sassy sides, and to have the assurance that we'll be friends for eternity. Love you, girl!!

So, on to the fun stuff... four random commenters will receive a $15 store credit during this hop - so the more comments you leave, the better chance you have at winning! Comments must be left by midnight EST Friday, November 30th, and winners will be announced on the SNSS Blog on December 1st at 8am EST.  Links to all the participants' projects can be found in the thumbnails at the bottom of my post. Have fun!


I used acrylic paints to color my focal panel, stamping additional images from the Vintage Postcard and Grunge Borders sets and Light of Christmas Background with Versafine inks. The candle (Christmas Light set) is pieced with Basic Grey cardstock.


It's hard to see, but the circle glow around the candle is actually the postmark stamp from the postcard set. Love that little detail!


Click around on the links below to see more projects - remember, the more comments you leave, the greater your chances of winning. Thanks for stopping by!!
Thanks for stopping by!

Tuesday, November 27, 2012

Heartfelt Creations DT Alumni Hop

It's time again for the Heartfelt Creations Design Team Alumni monthly blog hop... We've chosen the last Tuesday of each month to share a project featuring Heartfelt Creations' stamps when we can, just for fun.  If you'd like a chance at winning a prize, be sure to leave a comment on every blog along the hop by Friday - there is a $25 gift certificate up for grabs for one random commenter! If you'd like to view the entire hop, click over to Sarah's blog to get started. If you're following along with the hop already and you've arrived here from Kristina's blog, you're doing just fine.

 Here's another painted card, using acrylics - I started with a sheet of cardstock that's been protecting my workspace for a few weeks, so it had a random coating of paint and ink already on it. The flower stamps are from an older set, which seems to have been discontinued... it was one of the first stamp sets HC came out with when they began coordinating stamp sets with Spellbinders dies! I am so proud of how things have developed for them, and how far they have come since then!! So amazing. I actually had this in my 'sell' pile, but not anymore... I love the big bold florals for mixed media work like this!


Acrylic paint mixed with water works a lot like a watercolor paint, and adds a soft touch to the bold colors. I splattered some watered down paint (beige) and added more dots with the end of my paintbrush.


Ready to hop on? Your next stop is Emilia's blog! Thanks for joining us!!

Thanks for stopping by!

Thanksgiving

Said I'd share some pictures from our Thanksgiving celebration... I'm so thankful that we're able to have a full traditional meal, even though many of the dishes have to be made from scratch. I spread my cooking out over the week, and really enjoyed that. I was able to make most of the dishes gluten-free, too, so I could enjoy them, too.


On the menu: turkey, dressing, rolls, sweet potato casserole, green bean casserole, mashed potatoes, gravy, and cranberry sauce.  We had our small group over to celebrate with us - they come from 4 different regions of the country, and for most of them, these were all new flavors. We had a few western friends come as well for a total of 21 mouths to feed, but we were the only Americans at the party.


The day before our big dinner we had a gas leak in the oven... last year the gas ran out in the middle of cooking the turkey - there's always something! Saturday when the turkey was about halfway done, the power went off. And stayed off until the next day. So thankful we have a gas oven! All that was affected was the dressing (moved from the crockpot to the oven) and the mashed potatoes (mashed by hand instead of in the mixer).


And the party moved outside after dinner was over.


Dessert was pumpkin pie, apple pie, and Klappertaart (a Dutch recipe and local specialty). Here's a link to the Klappertaart recipe, for those who are curious... we added a meringue to the top of ours. We did use fresh young coconuts... if you're somewhere where those aren't available, check your local Asian food store for canned or frozen young coconut meat.


Just a little peek into my life! I'll share more another day. :)

Thanks for stopping by!

Sunday, November 25, 2012

Dimensional Vintage Ornament

The discount code THANKS is still good for 25% off your entire order at www.iostamps.com -- don't forget!

I love adding dimension to my cards - here's an easy way to make a 'pop-up' ornament on a simple, mailable Christmas card.This is a great way to use up coordinating cardstock too!


I used 2 dies, and a clear stamp set on my card:
Vintage Ornament Die Set
Pine Branch Die
Winter View clear set

I scored along the 'center' of each pine sprig so the branches would look more realistic and dimensional.

Here's how I achieved the dimension on the ornament. I cut out 5 ornament shapes, then scored them down the middle and folded them in half...


Next, I glued the folded ornaments together to the fold lines, back-to-back.

Here's what the diecuts looked like when I was done - you could use more if you wanted - I think the important thing would be to have an odd number so the ornament lies flat when you tuck the card into an envelope.


Here's one more sneak peek - in case you're concerned that an ornament die could only be used at Christmas time... take a look at these Vintage Ornament calla lilies! I'll save that tutorial for another time, but aren't they fun? I love dies that are versatile.

Thanks for stopping by!

Thursday, November 22, 2012

Impression Obsession 25% sale in progress!

If you've been waiting for Impression Obsession's annual sale, it's on!! This year the sale is 25% off the ENTIRE SITE! The site has been updated with a TON of clearance stamps (really, a TON...more than we ever have -- 80 clearance clear sets, 541 red rubber cling stamps, and 406 wood mounted stamps). Some of these are in EXTREMELY limited quantities.  The 25% discount will apply to the already discounted clearance section as well.

The sale begins NOW and will end next Wednesday, November 28 at midnight, Eastern Standard Time.  

To receive the 25% sale pricing enter the code THANKS at checkout.  Just type in THANKS and click on the button that says "Click to Redeem" and that's it!

Happy Thanksgiving and Happy Shopping!

Click here to go to the website:
 Thanks for stopping by!

SNSS Fall & Christmas Sale!

Happy Thanksgiving to my American compatriots...! I'm loving all the recipes and reports on what you're cooking next... I've been cooking since yesterday, but we'll be celebrating Saturday, since that works better with our campus schedule... I can't wait! Thanksgiving dinner is interesting cooking everything from scratch, but I'm sooooooooo thankful that we are able to celebrate with all the proper fixings. We'll be sharing our meal with our discipleship group - all of them are from remote areas, and they will be experiencing a lot of new flavors! I'll be sure to share pictures later on.

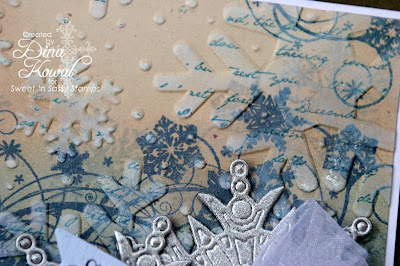
Just wanted to let you know that Sweet 'n Sassy Stamps' Christmas sets are all 30% off this week! I have a few sets over there that fit this category, so if you've been waiting to purchase them, now's a great time. The sale runs from Nov. 21-30. I used a few of those sets to create the card below, along with an embossing folder from Sizzix and a snowflake die from Impression Obsession. 


These are the sets I used:
Christmas Tag (mix and match sentiments - currently unavailable... but if you'd like it, send Korin a message! If there is enough interest she will reorder.)


I stamped the flourish on tan cardstock first, then sponged brown and blue ink from the bottom up. After running the panel through the snowflake embossing folder, I inked the raised parts with white dye ink and the script stamp. The snowflake diecuts are painted with pearlescent white paint.


If you're looking for a great deal on Fall sets, those sets are 40% off until Monday, Nov. 26th.

Hope you have a wonderful day, no matter where you are or what you're celebrating! I'm grateful for you! Thank you for stopping by!!

Thanks for stopping by!

Monday, November 19, 2012

Nighttime Pumpkin Scene

One more Fall card using Sandy's nighttime scene tutorial found HERE - this image is just called Pumpkins, and I colored it with my Touch Twin markers. This full scene was more difficult to color in this style, especially with the moonlit background... but it's always fun to try new things! I'm not sure that I really 'nailed' the light source, but it's sort of like the pumpkins are lit by a porch light, while the barn and house are lit by the moon.

Just pretend. :)


To offset the dark scene, I framed the piece in white, and embellished it with diecut leaves (Impression Obsession) and a flourish from Cheery Lynn.


These are the colors that I used... I don't have my usual color map, because there are so many layers of color here...! The warm greys were used to shade the pumpkins, and the blue greys were used in the background.


You can click HERE for a daytime version of this same image... AND check out Sandy's blog - we've been doing random, informal coloring 'throw down' challenges, and she's colored up a similar image today!  Thanks for stopping by!

Thanks for stopping by!

Saturday, November 17, 2012

Fall Mitten

One more card for this week's Fall Card challenge at Impression Obsession... I thought a mitten would be fun for Fall, so I inked the edges of the mitten stamp (Large Solid Mitten) with distress ink, then used a kissing technique to stamp the mitten stamp with a knitted texture (CAC Knit). I die cut the image with the mitten die, then added the diecut chipboard leaves as an embellishment.


The sentiment can be found HERE.
Have a great weekend!

Thanks for stopping by!

Thursday, November 15, 2012

Impression Obsession DT Challenge: Happy Fall, Y'all!

The Impression Obsession team's challenge today is to create a card with a Fall theme!

I love this Maple Leaves stamp, and I've been having so much fun with my acrylic paints lately - I've also been trying to work on realistic shadows, so I played with that a little here too.


One hint for mixed media type painting - when I stamp and paint, I always keep a sheet of cardstock underneath my work. All the ink, gesso, and paint that goes off the edges of my piece as I'm working goes onto that sheet, and whatever leftover paint I have in my palette goes onto that sheet. When it gets messy and painty enough, it gets cut up and used as the base for a painting. This panel base started off that way!


This is also my sample card for a new challenge over at Designed to Color, which will post later today. Can you guess what the challenge theme is?


Here's another painted card using the same stamp, and this week's sketch challenge at Splitcoaststampers - I also used French Letter, CAC Script, and Paris Registre to fill in my background. The die is from Cheery Lynn Designs.


Be sure to check out these other designers' blogs for inspiration -

Daniela @ For the First Time
Jeanne @ Inky Paws
Jenny @ One Krafty Kat
Kittie @ Kittie Kraft
Laura @ Laura's Stamp Art Journal
Vicki @ Summerthyme Studio

Remember you can enter these challenges too, using your Impression Obsession stamps! See the I.O. blog for all the details - you might even win a $25 gift certificate!! We'd love to have you join us.
Thanks for stopping by!